
Hotkey to download a file firebase console - remarkable
Phrase very: Hotkey to download a file firebase console
| Download pc keeper | 293 |
| Dark tower audiobook free download | 768 |
| Free download clipart santa hat | 617 |
| How to download microsoft excel for free on mac | 587 |
| Overland free download | 668 |

Retool | Documentation
Retool supports Firebase's Admin API and allows you to build fast and useful CRUD apps on top of Firestore, RealtimeDB, and Auth data.
To build on top of your Firebase data in Retool, you'll need to (gasp) connect your Firebase setup. Once you've created your Retool account, head over to the Resources tab, click the "create new" button, and select Firebase from the "APIs" section.
Here's what you'll need to provide:
- Your Firebase Database URL
This is a bit tricky - go to your Firebase console, then to Database, then toggle from Cloud Firestore to Realtime Database (weird, I know). This will expose a URL in the form , which is what you need to copy into Retool.
- Your Firestore Project ID
Head back to your Firebase console settings, and copy the Project ID. It should look something like .
- Your Service Account Key
If you're already in your Firebase console (you should be, if you're following along), you can click on your settings pane, choose the "service accounts" tab, click on the "Firebase Admin SDK" icon, and then click the "Generate new private key" button. That should download a JSON blob that you can paste directly into Retool.
If this didn't work, you can also create an account key from your Google Cloud Platform console. Go there, select a project, hit Create Service Account, name it whatever you want, then in "role" select Firebase Admin. Click continue, then Create Key, then choose the JSON one. It'll download and then you can copy it into Retool.
Your configuration should resemble something like this:
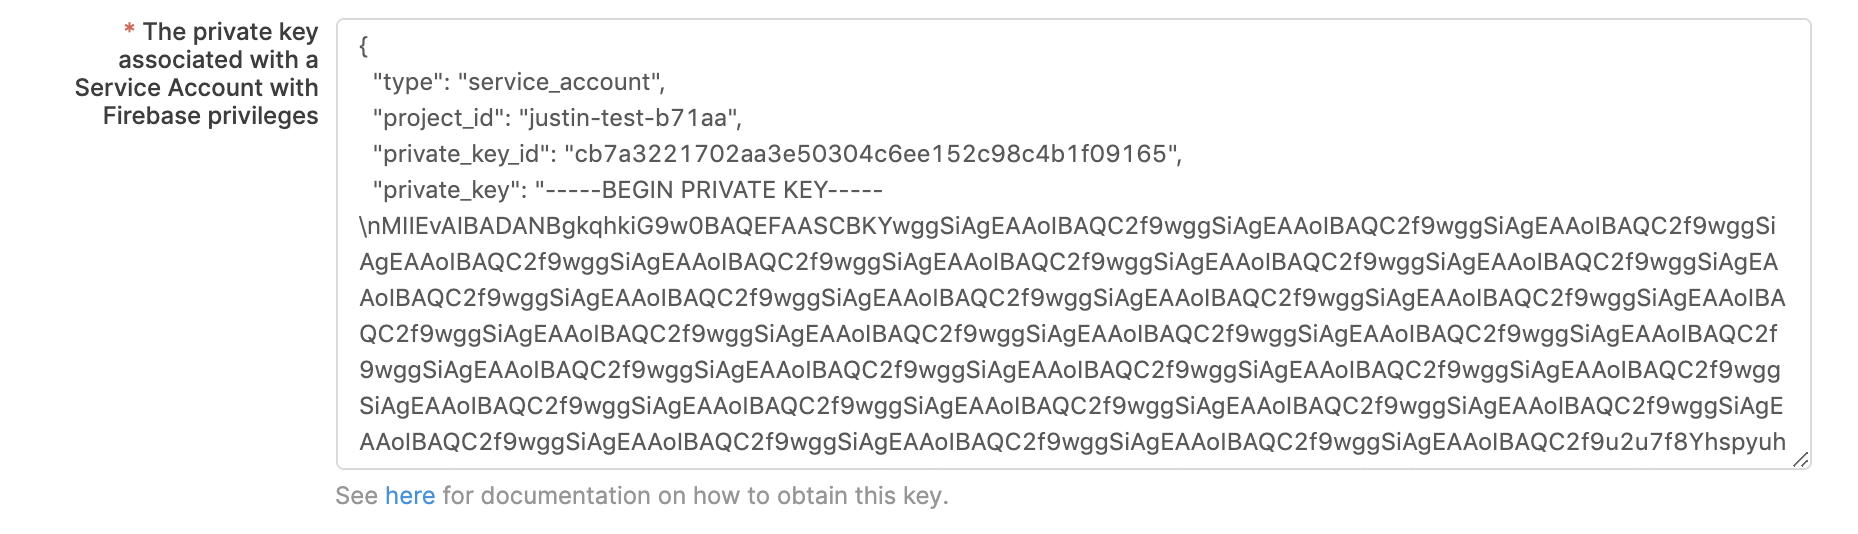
After providing the Service Account Key and the Database URL, hit "Save." Retool will validate that it's able to connect to your Firebase database and then you're ready to go.
Working with the RealtimeDB
The query the RealtimeDB, create a new query (+new in the bottom panel), and select your Firebase resource from the resource dropdown. Then, choose "Database (read / write)" from the service type dropdown and select "Query database" as the action type.
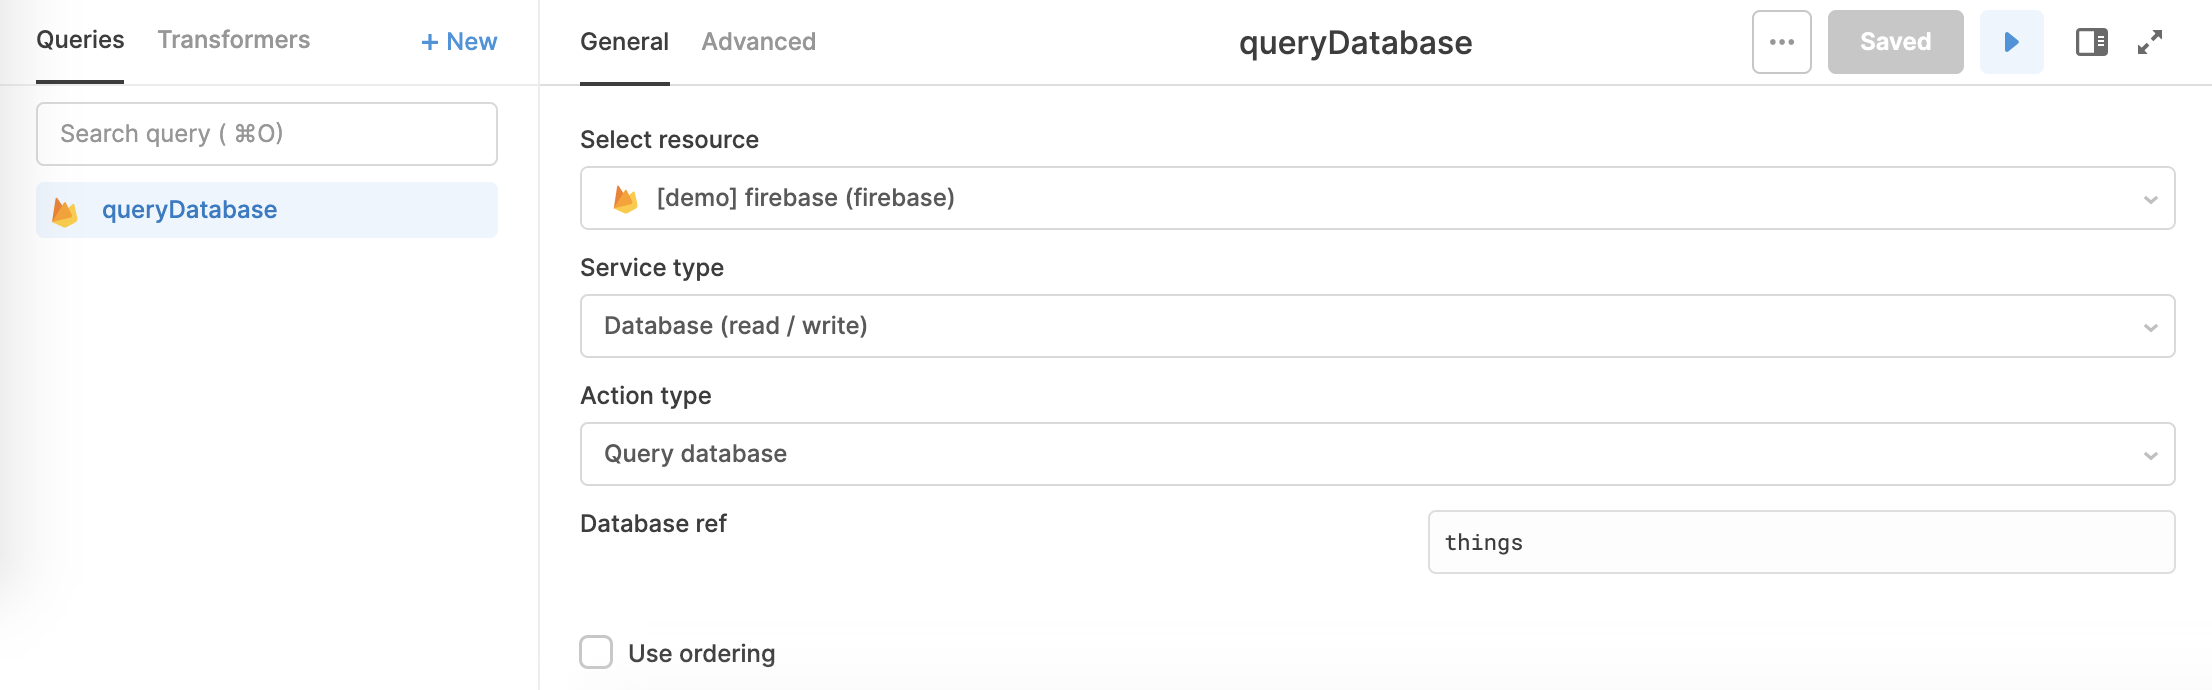
All you need to query the DB is a Database ref. In our setup, we have top level refs for and , so we can use either of those in our query.
If you click the "use ordering" checkbox, you'll get access to a bunch of different ordering and filtering options:
- Ordering by child, key, or value
- Limiting to first or last
- Using , , and to filter your queries
We recognize this is a bit confusing, as not all of these options actually relate to ordering - we'll be fixing this soon!
Setting and updating data
The Firebase database offers two different APIs for updating data:
The method replaces your chosen object with the value that you provide. So if your object has 5 fields, and you use and pass something with 3 fields, it will now have 3 fields. To use this method in Retool, just choose "Set" from the action type dropdown. You'll need to provide a database ref and an object to set.
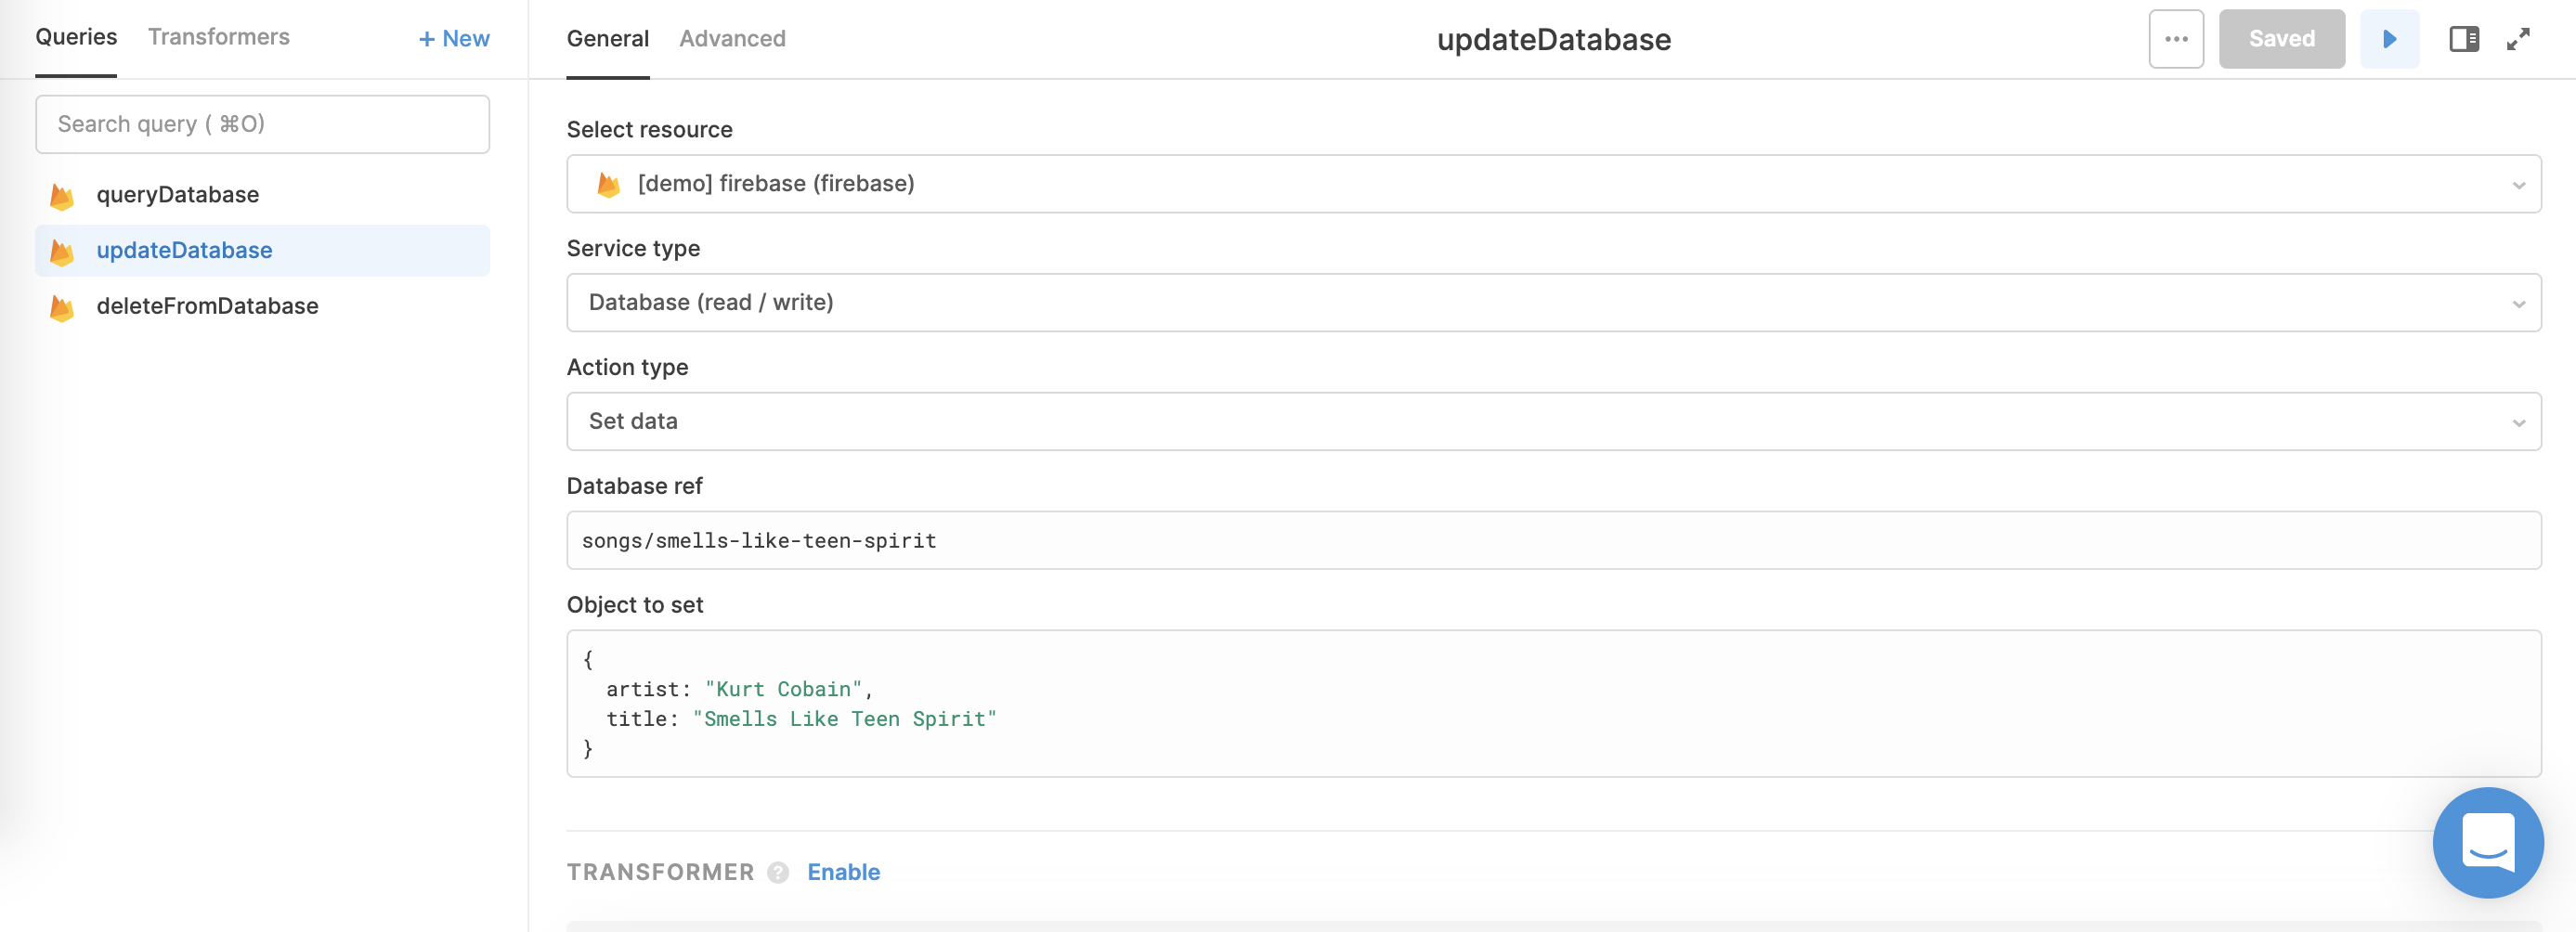
The method updates fields if they exist, but doesn't replace an entire object. The query format is the same as - just choose "Update data" from the action type dropdown and provide your database ref and update object.
❗️
You cannot set or update root level properties
Retool doesn't allow you to run or queries on the root of your database - if your database ref doesn't have a in it (i.e. references a child), you'll get an error on your query.
If you input a database ref but still get this error, you might need to try prepending it with a slash (e.g. instead of ).
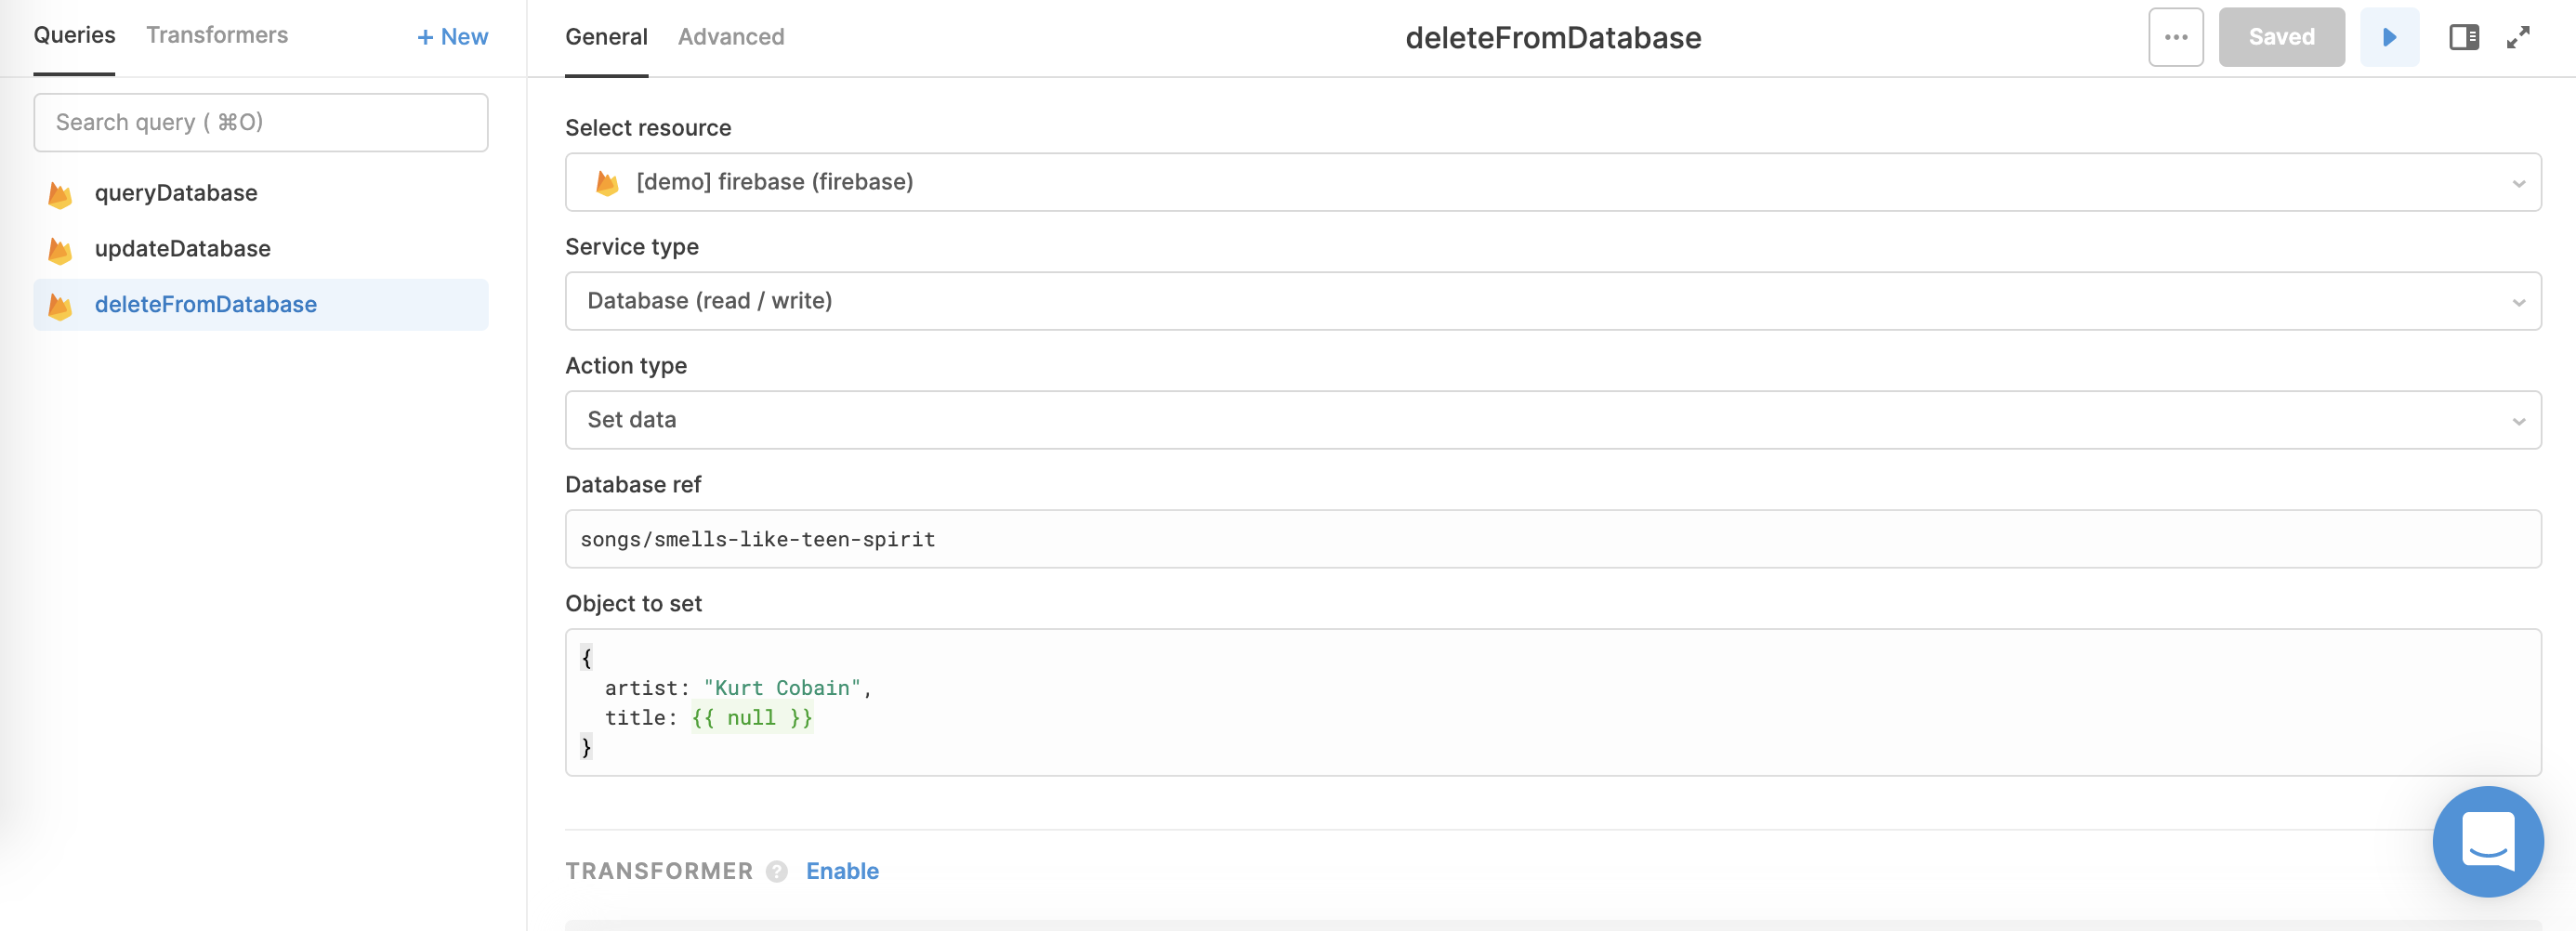
Retool doesn't support deleting fields or objects directly, but you can get it done via the method. If you a property to null, it will get deleted from the database - just keep in mind that you'll need to pass that as Javascript in curly braces (). Here's an example of how we'd delete the "title" property from our object:
All of these examples will use Firestore, but the same concepts apply to the RealtimeDB if you’re using that. Once you’ve connected your Firebase account to Retool (see previous section), you can get started querying Firestore right away.
📘
Firestore Admin Panel Template
If you're looking to do basic CRUD on your Firestore data, we built a template that can help you get started. You can see more details here, or click "create new" and then "create from template" on your Retool homepage. Look for the Firestore Admin Panel template to get building.
Querying Firestore and getting Collections
To query Firestore, create a new query (+new in the bottom panel), select “Firestore” from the service type dropdown, and choose “Query Firestore” as the action type. You can specify a collection via the dropdown, or input a custom value by clicking “Use raw id.”
The Retool GUI lets you query via a key (a document field), an operator (, , , etc.), and a value. You can add as many statements as you want, add a limit, an order by field, and other fun stuff too.
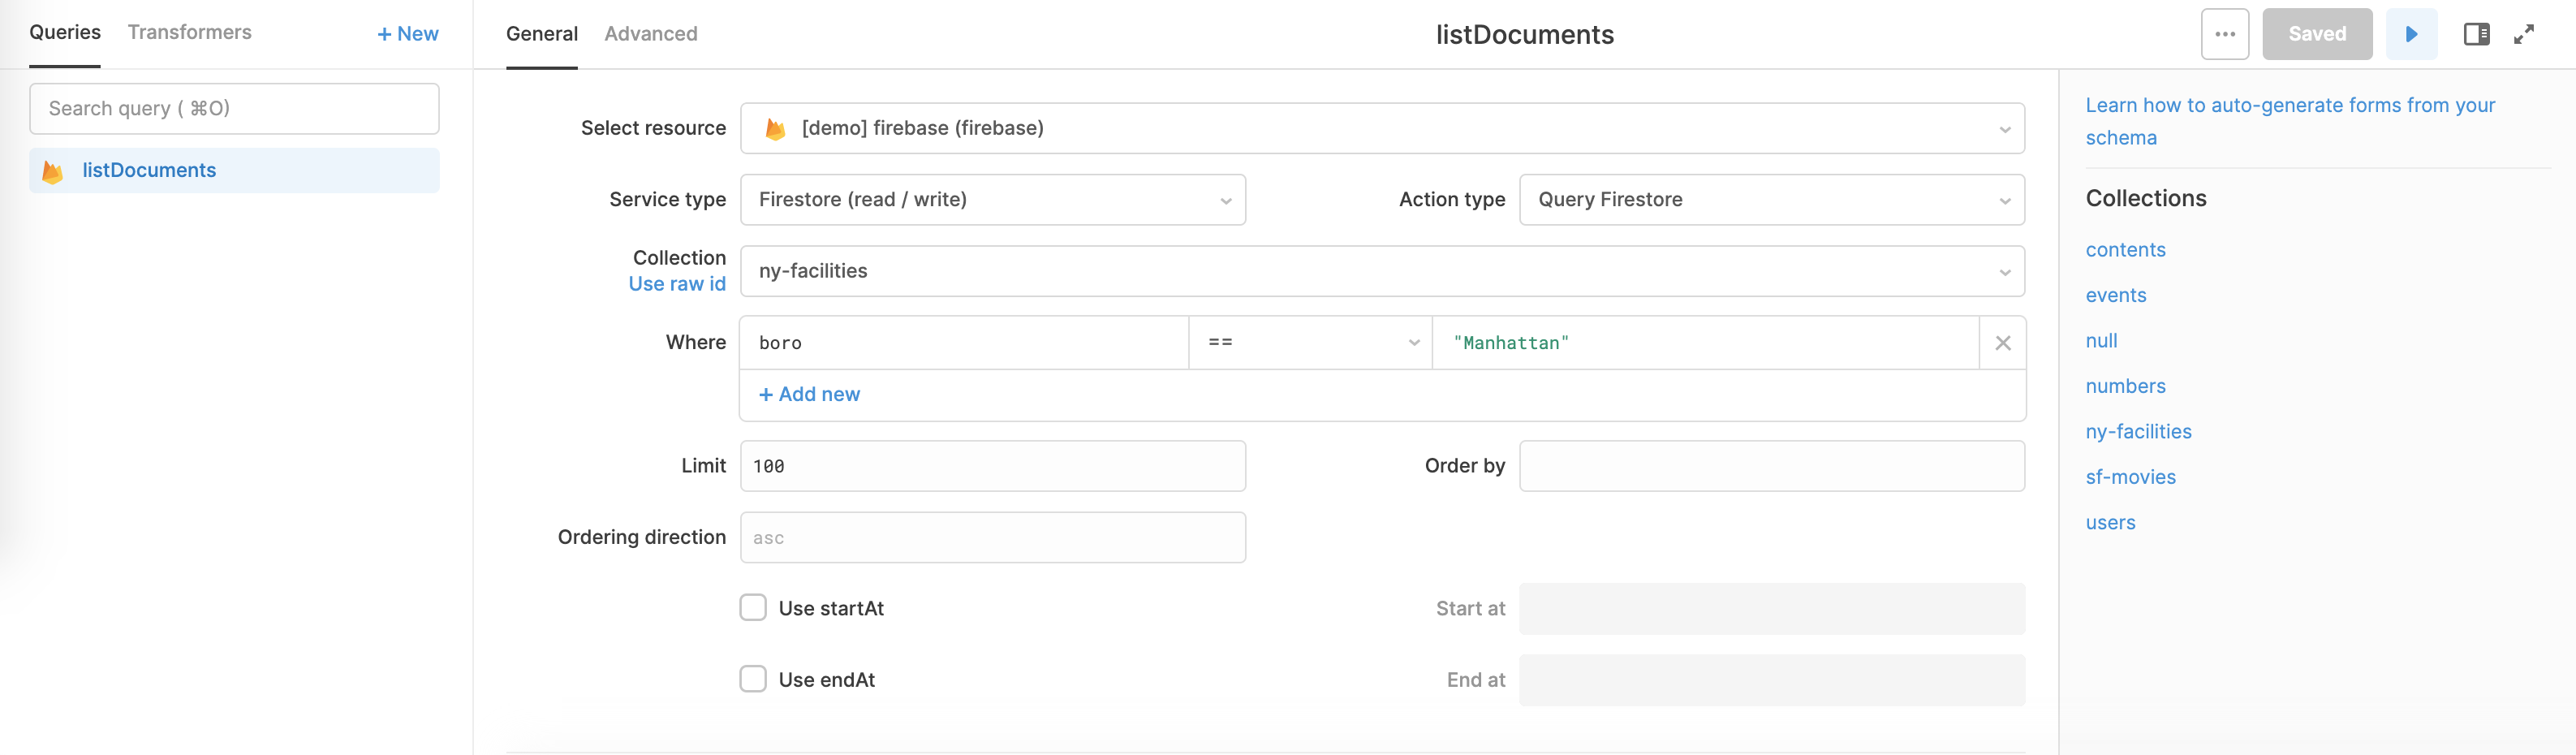
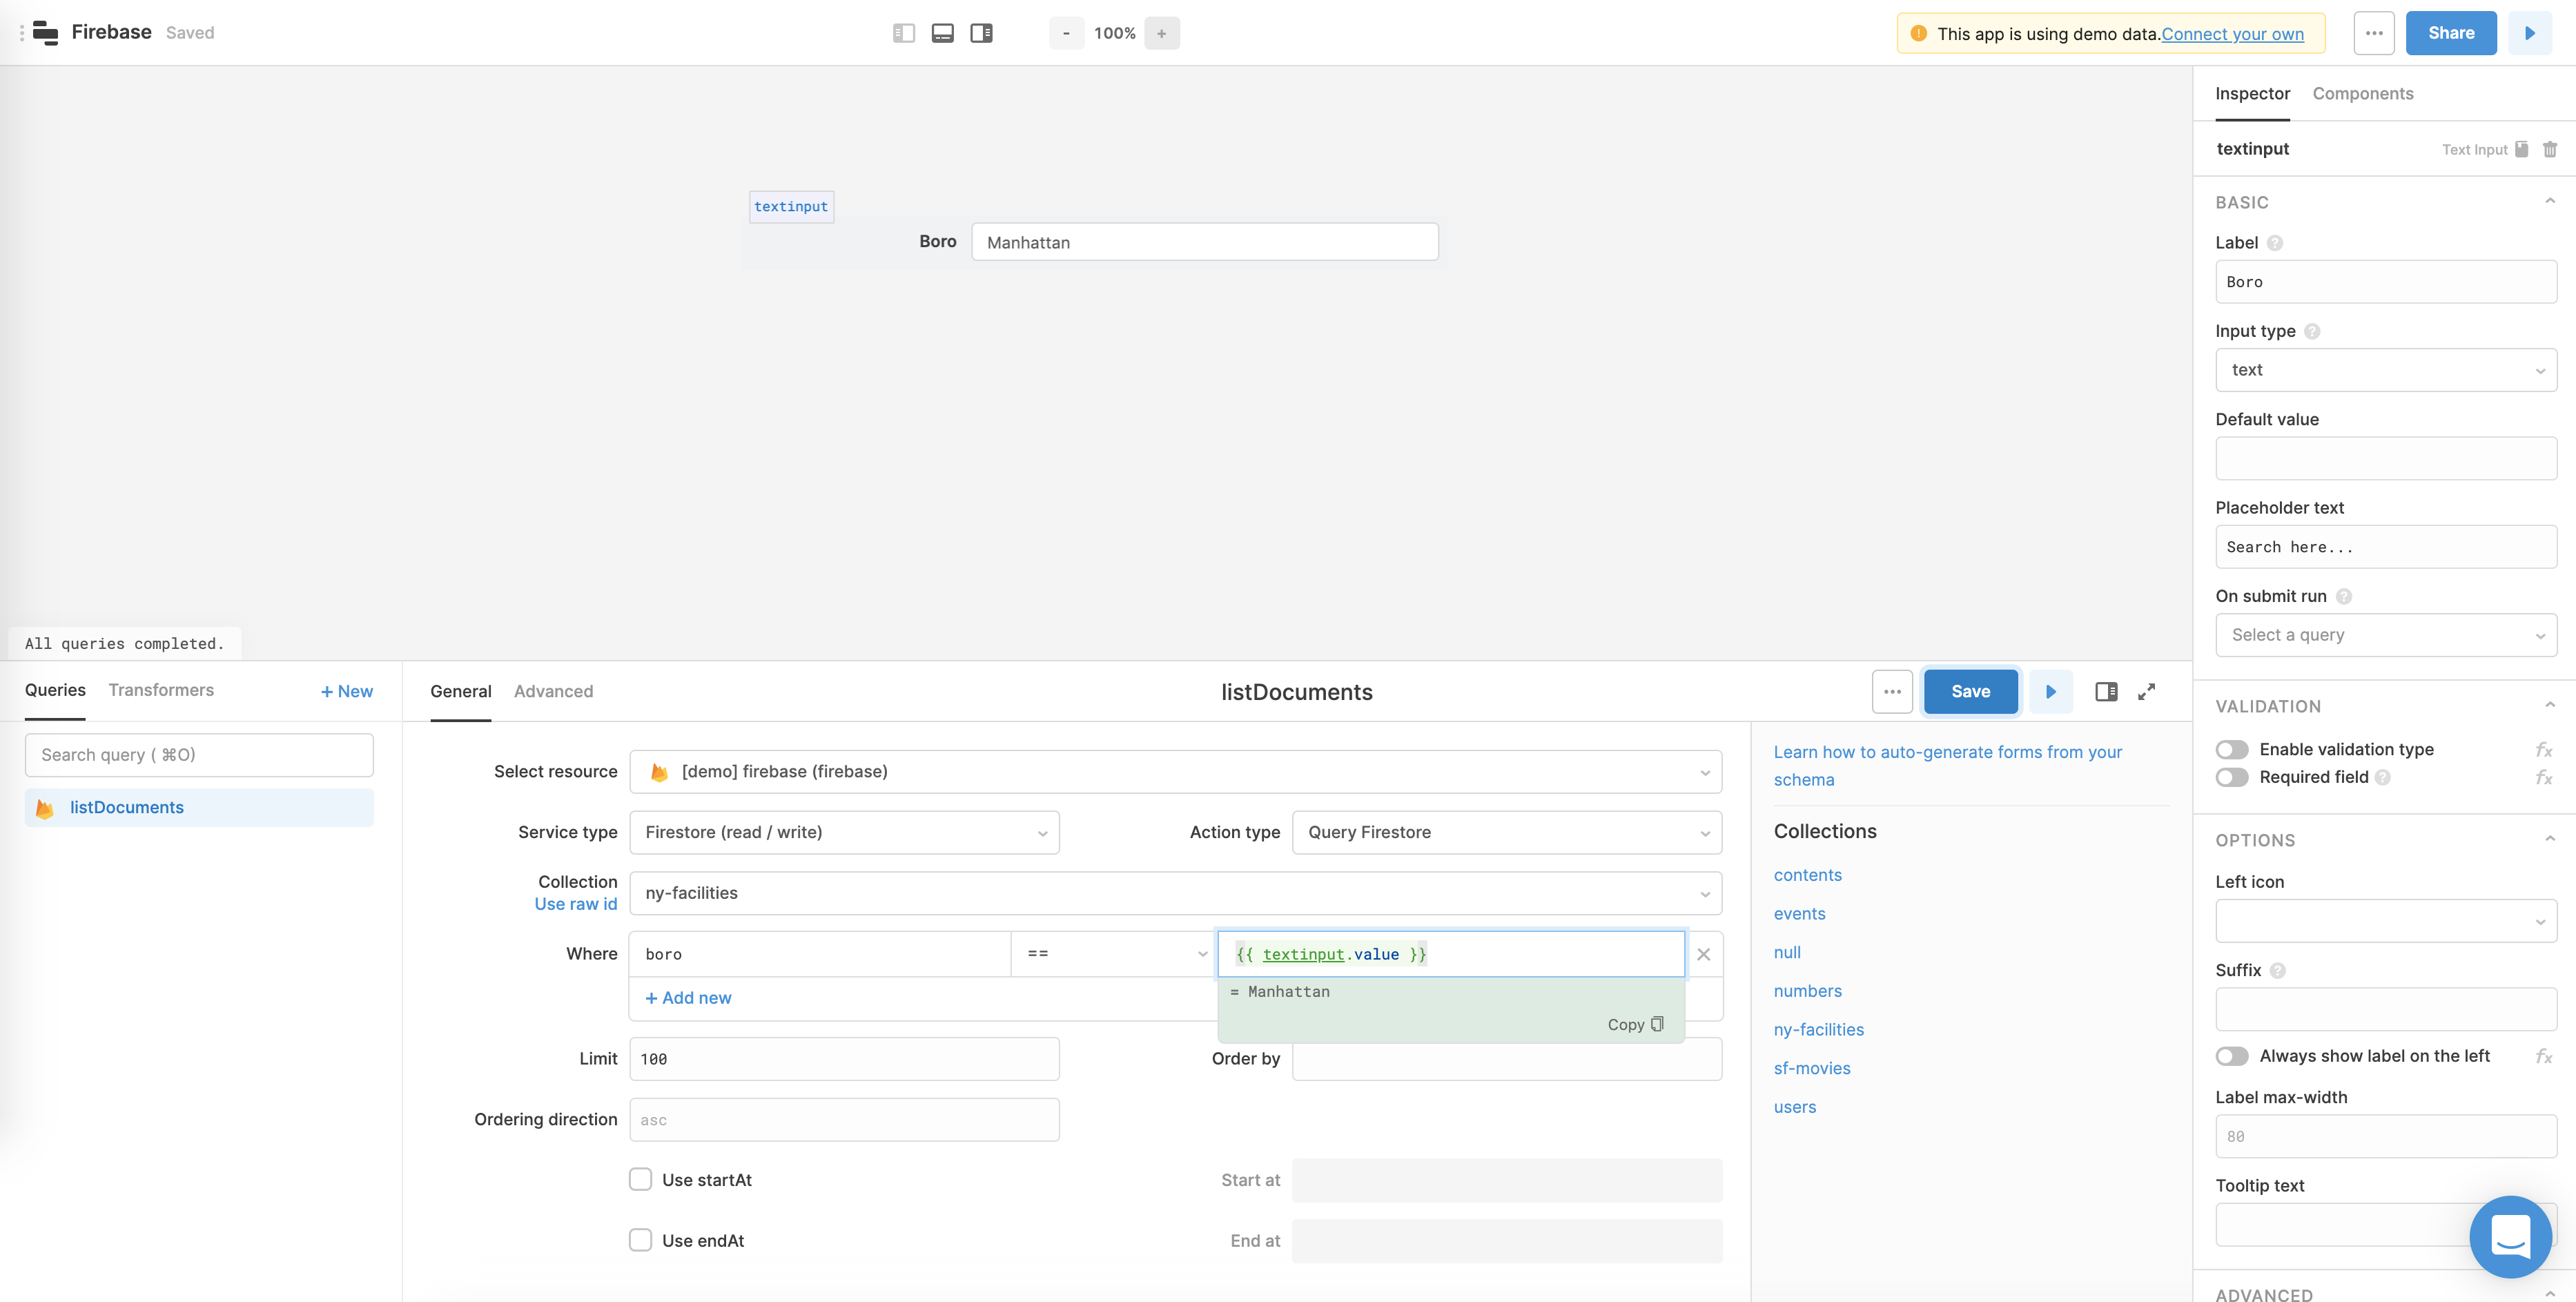
You can set the value of your key or value dynamically with JS, which you can use to implement search (or anything else). If we have a TextInput component, we can pass the value of that component into our “value” input. Here, we’ve added a TextInput component that allows the user to input a value for the “boro” field in our collection, and we’ve passing the value of that component into the “value” field in our Firestore query. Voila, search!
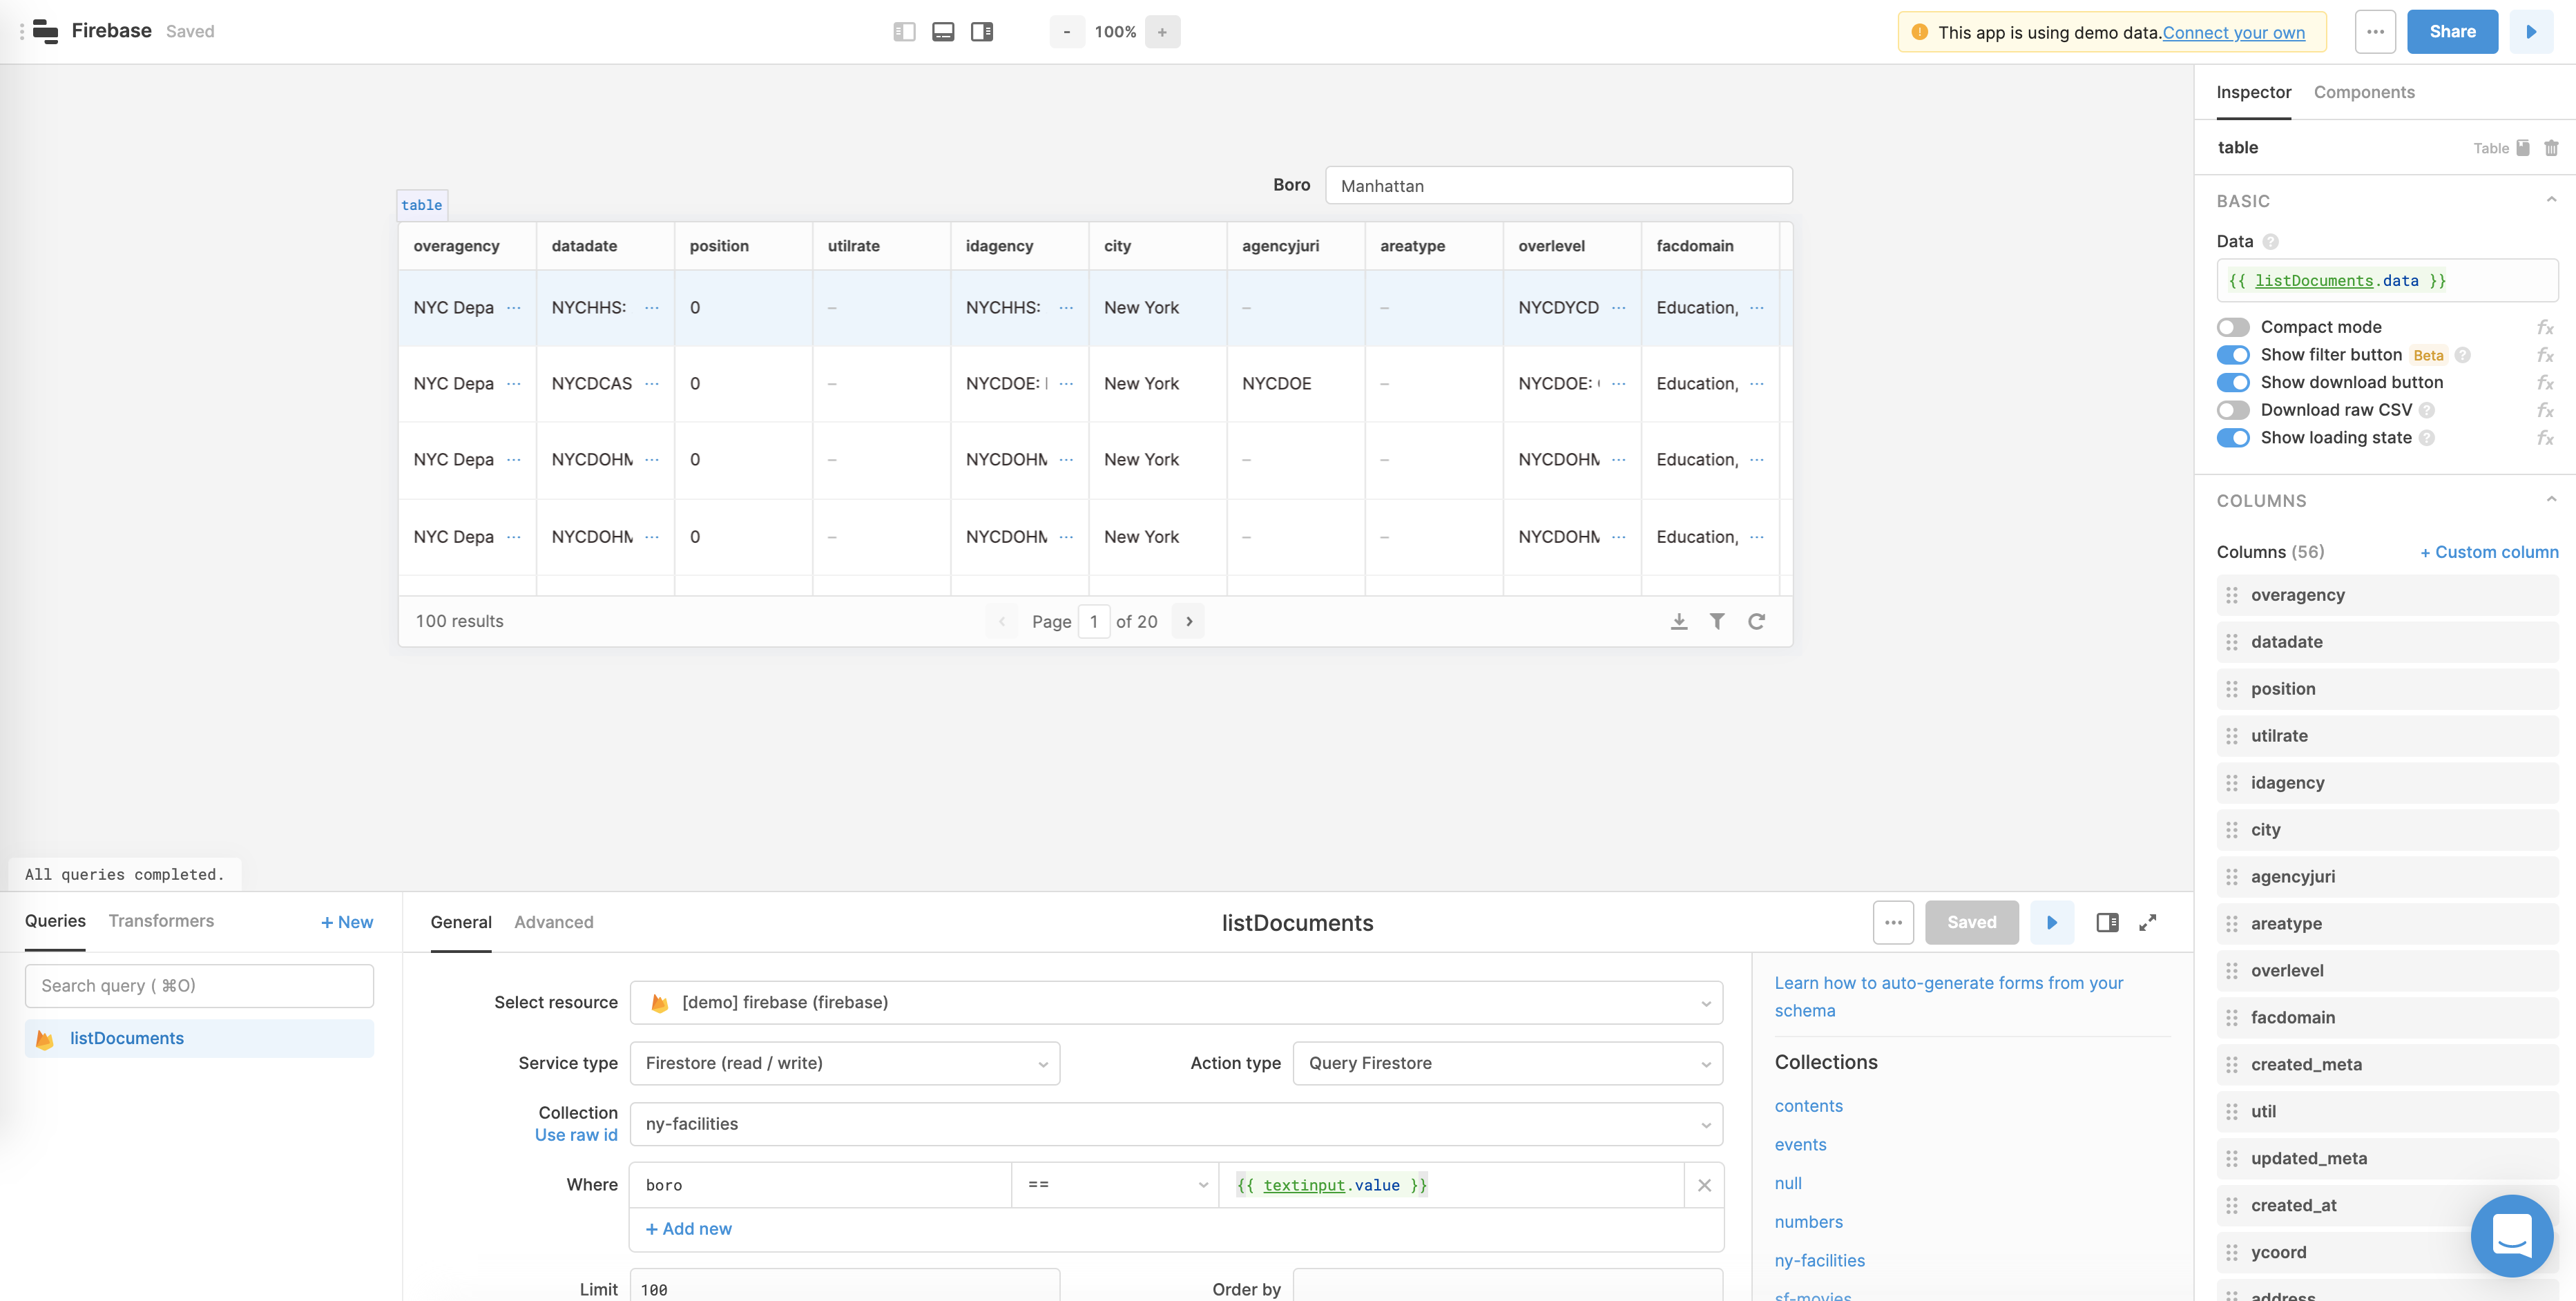
To get a birds-eye view of all of the documents in a collection, we can pull the results of this Firestore query into a Table component. The way our collections are formatted makes this as simple as referencing in our table’s “data” field, but your Firestore data might be organized differently.
🚧
Formatting Firestore query results for a Table component
The results of your Firestore query might not be in the right format for displaying in a table off the bat. You can write Javascript anywhere in Retool, so don't fret!
To display the data in a Table, you'll probably want to use something like this:
Or in more advanced cases where you would also like to pull in the Firebase key:
You can write this actual code in the "data" field for your table, apply it as a Transformer in your query, or create a standalone Transformer tool. Check out our Transformer docs for more info.
You can make use of helper functions like , but you might need to do some custom formatting work.
Retool also allows you to query available Firestore collections (top level or under a specific document ID), which we can use to dynamically select which documents you want to display in this table. To get started, we’ll create a new query that lists top level collections:

If we wanted to query a nested collection, we could specify the parent document ID in the provided form field (we’re currently working on supporting collection group queries). Now let’s pull the results of this query into a Dropdown component, and connect the value of that component to our original query. Make sure that your query is set to run when inputs change, not when manually triggered (scroll to the bottom of the “General” tab).
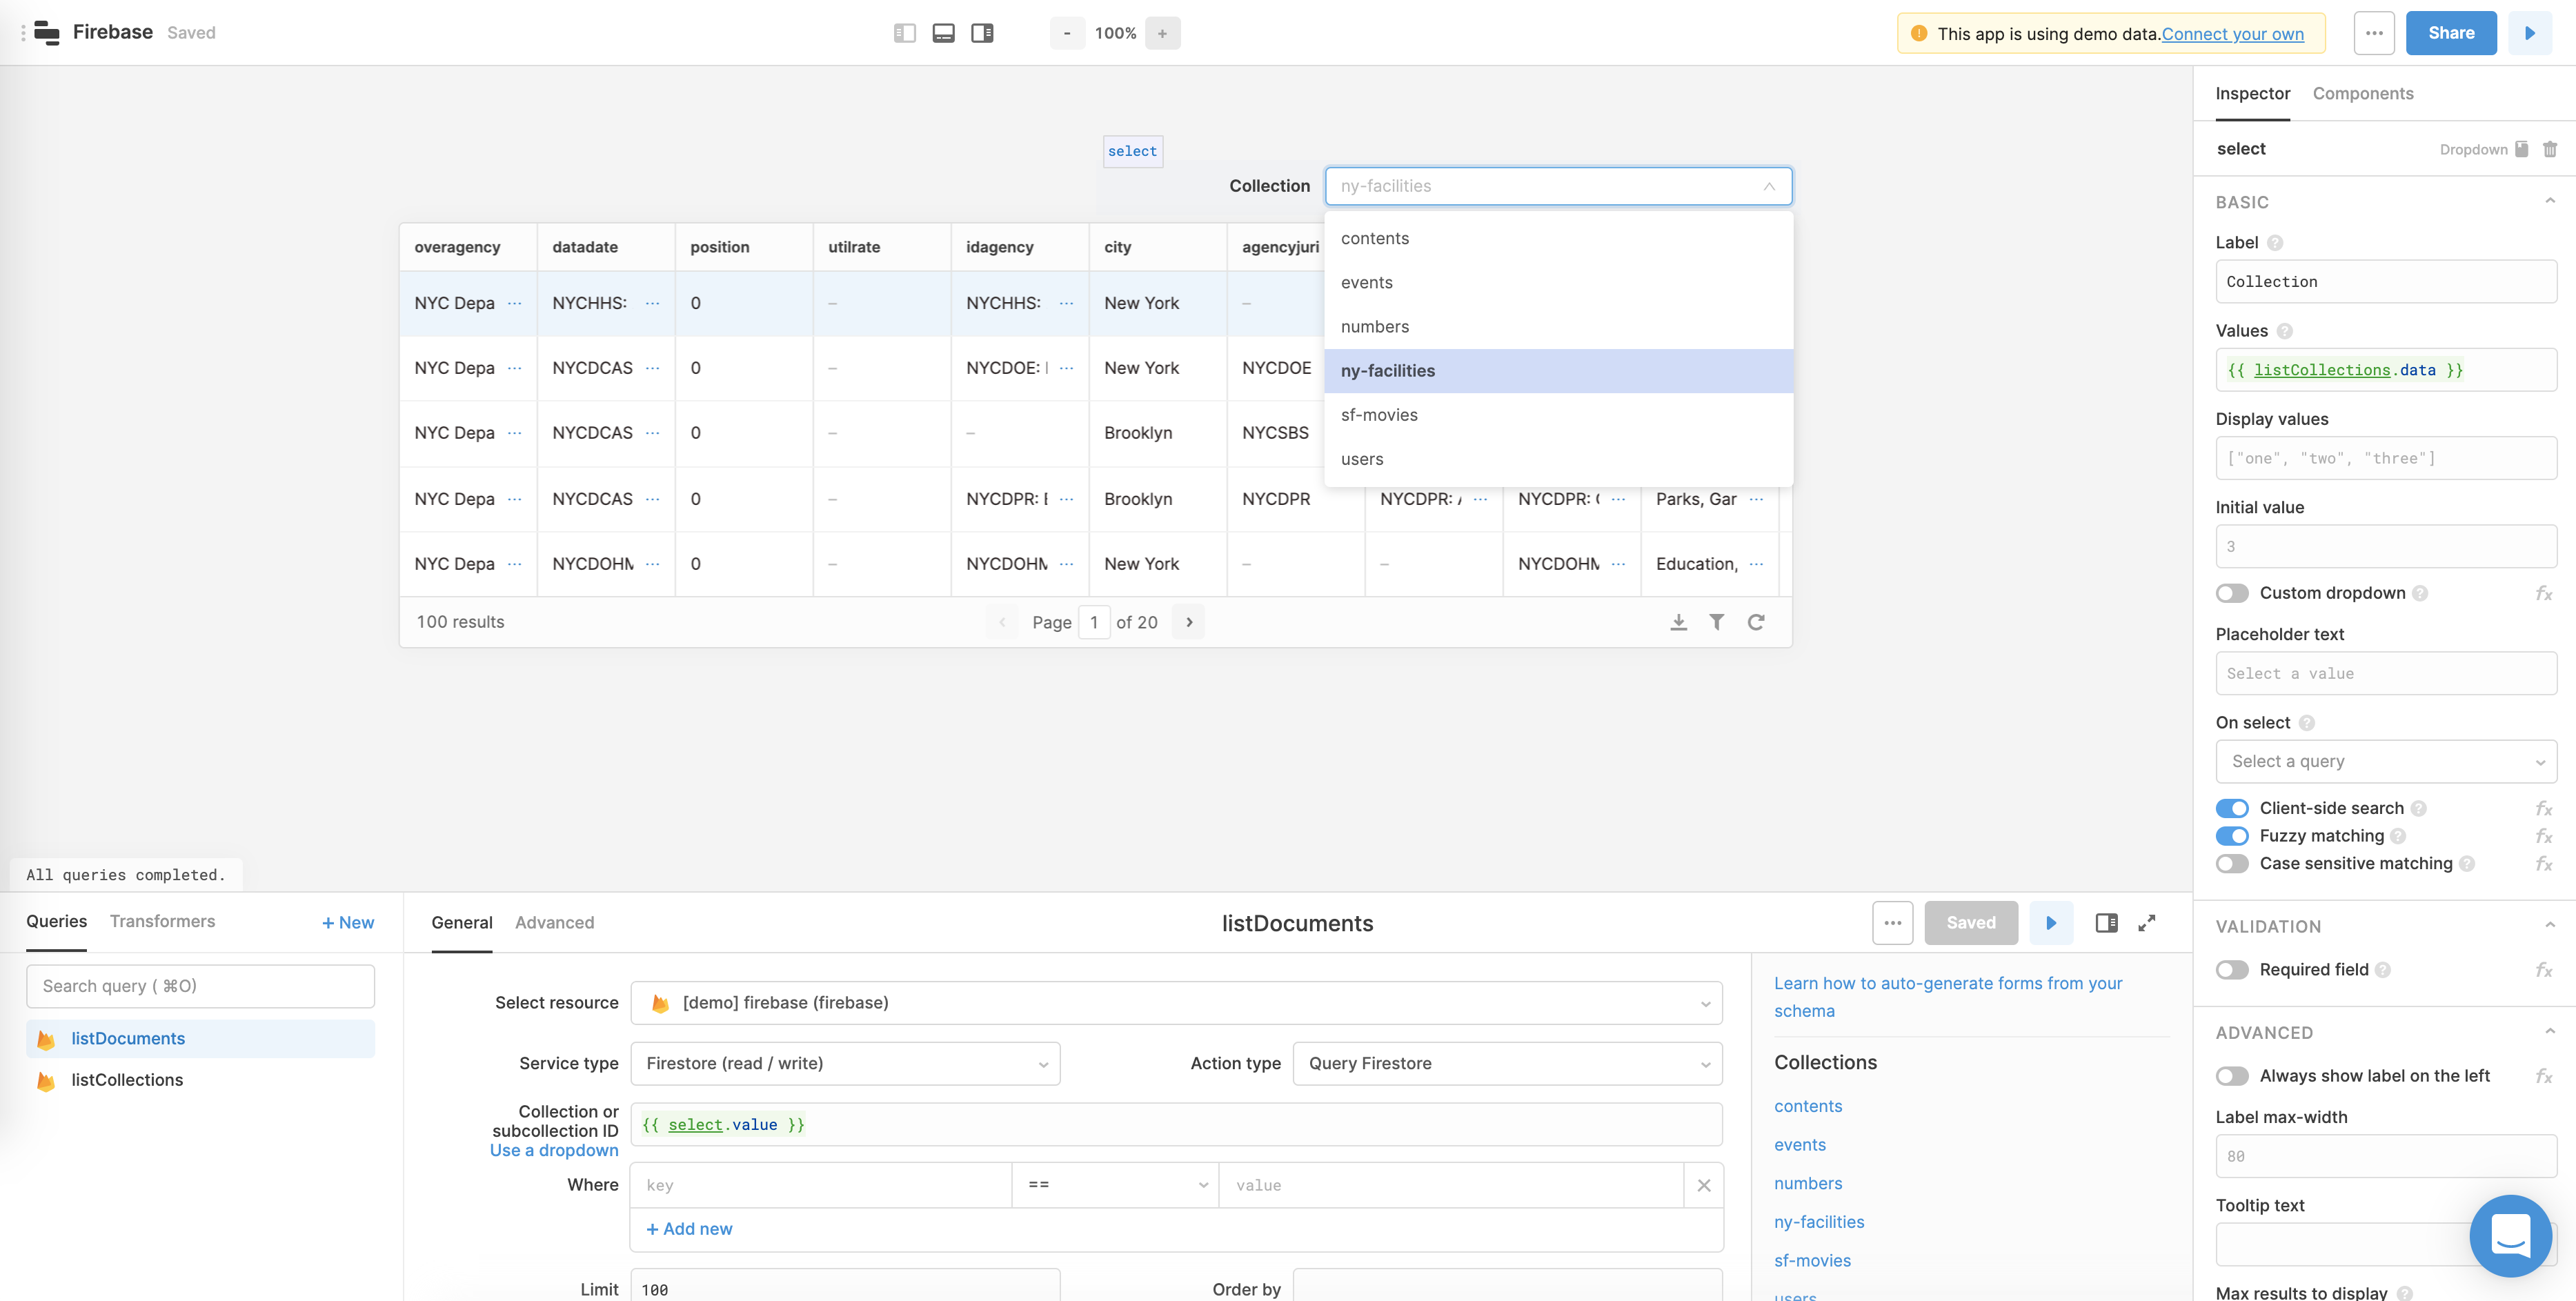
We’re populating the dropdown with the property of our new query, and then passing the dropdown’s value into the “Collection ID” field of our query (after selecting “Use raw id”). Now, selecting a new collection from the dropdown will update the table to show that selected collection’s documents. You can set custom display values, placeholder text, and an initial value (among other things) by clicking on the dropdown and using the righthand panel.
❗️
Changes to timestamp fields in Firestore
When you query Firestore, Retool returns any timestamp fields as ISO formatted strings.
Recently, after we upgraded our Firebase Admin SDK version, this changed and timestamp fields were being sent as objects (with keys for and ) for a few days, but we've reverted this change to keep persistent behavior.
Updating documents in Firestore
To update a Firestore document in Retool, you just need the document’s ID and the object you’d like to update it with. Create a new query (+new in the bottom panel), select your Firebase resource, choose “Firestore” from the service type dropdown, and choose “Update Document” as the action type.
You’ll need to specify a document ID and a value. For the “value” field, passing a partial object will update only your passed fields, and passing current values (e.g. fields with the same values as current) works too.

There are a few ways you might want to implement the UI here:
- A Form component with TextInput components for each document field you want to update
- A JSON Editor component that lets you update values directly, and submit the changed value with a button
- Making the Table component editable
You can choose whichever pattern best fits your users’ needs - as long as you format the results as a JSON object and pass it in the “value” field of your query, you should be good to go. Keep in mind that both of these fields - document ID and value - can be dynamic, so you can pass pretty much anything to them via JS in . Here, we’ll walk through how to edit document values directly through the Table component.
In the previous section, we built a table that pulls documents from the collection specific in a dropdown on top of our table. We can make this table editable, and connect it to our update query on the backend to update individual fields, or multiple fields all together. Start by clicking on the table, heading over to the “columns” section in the right sidebar, and updating each individual column (or whichever ones you want) to be editable.
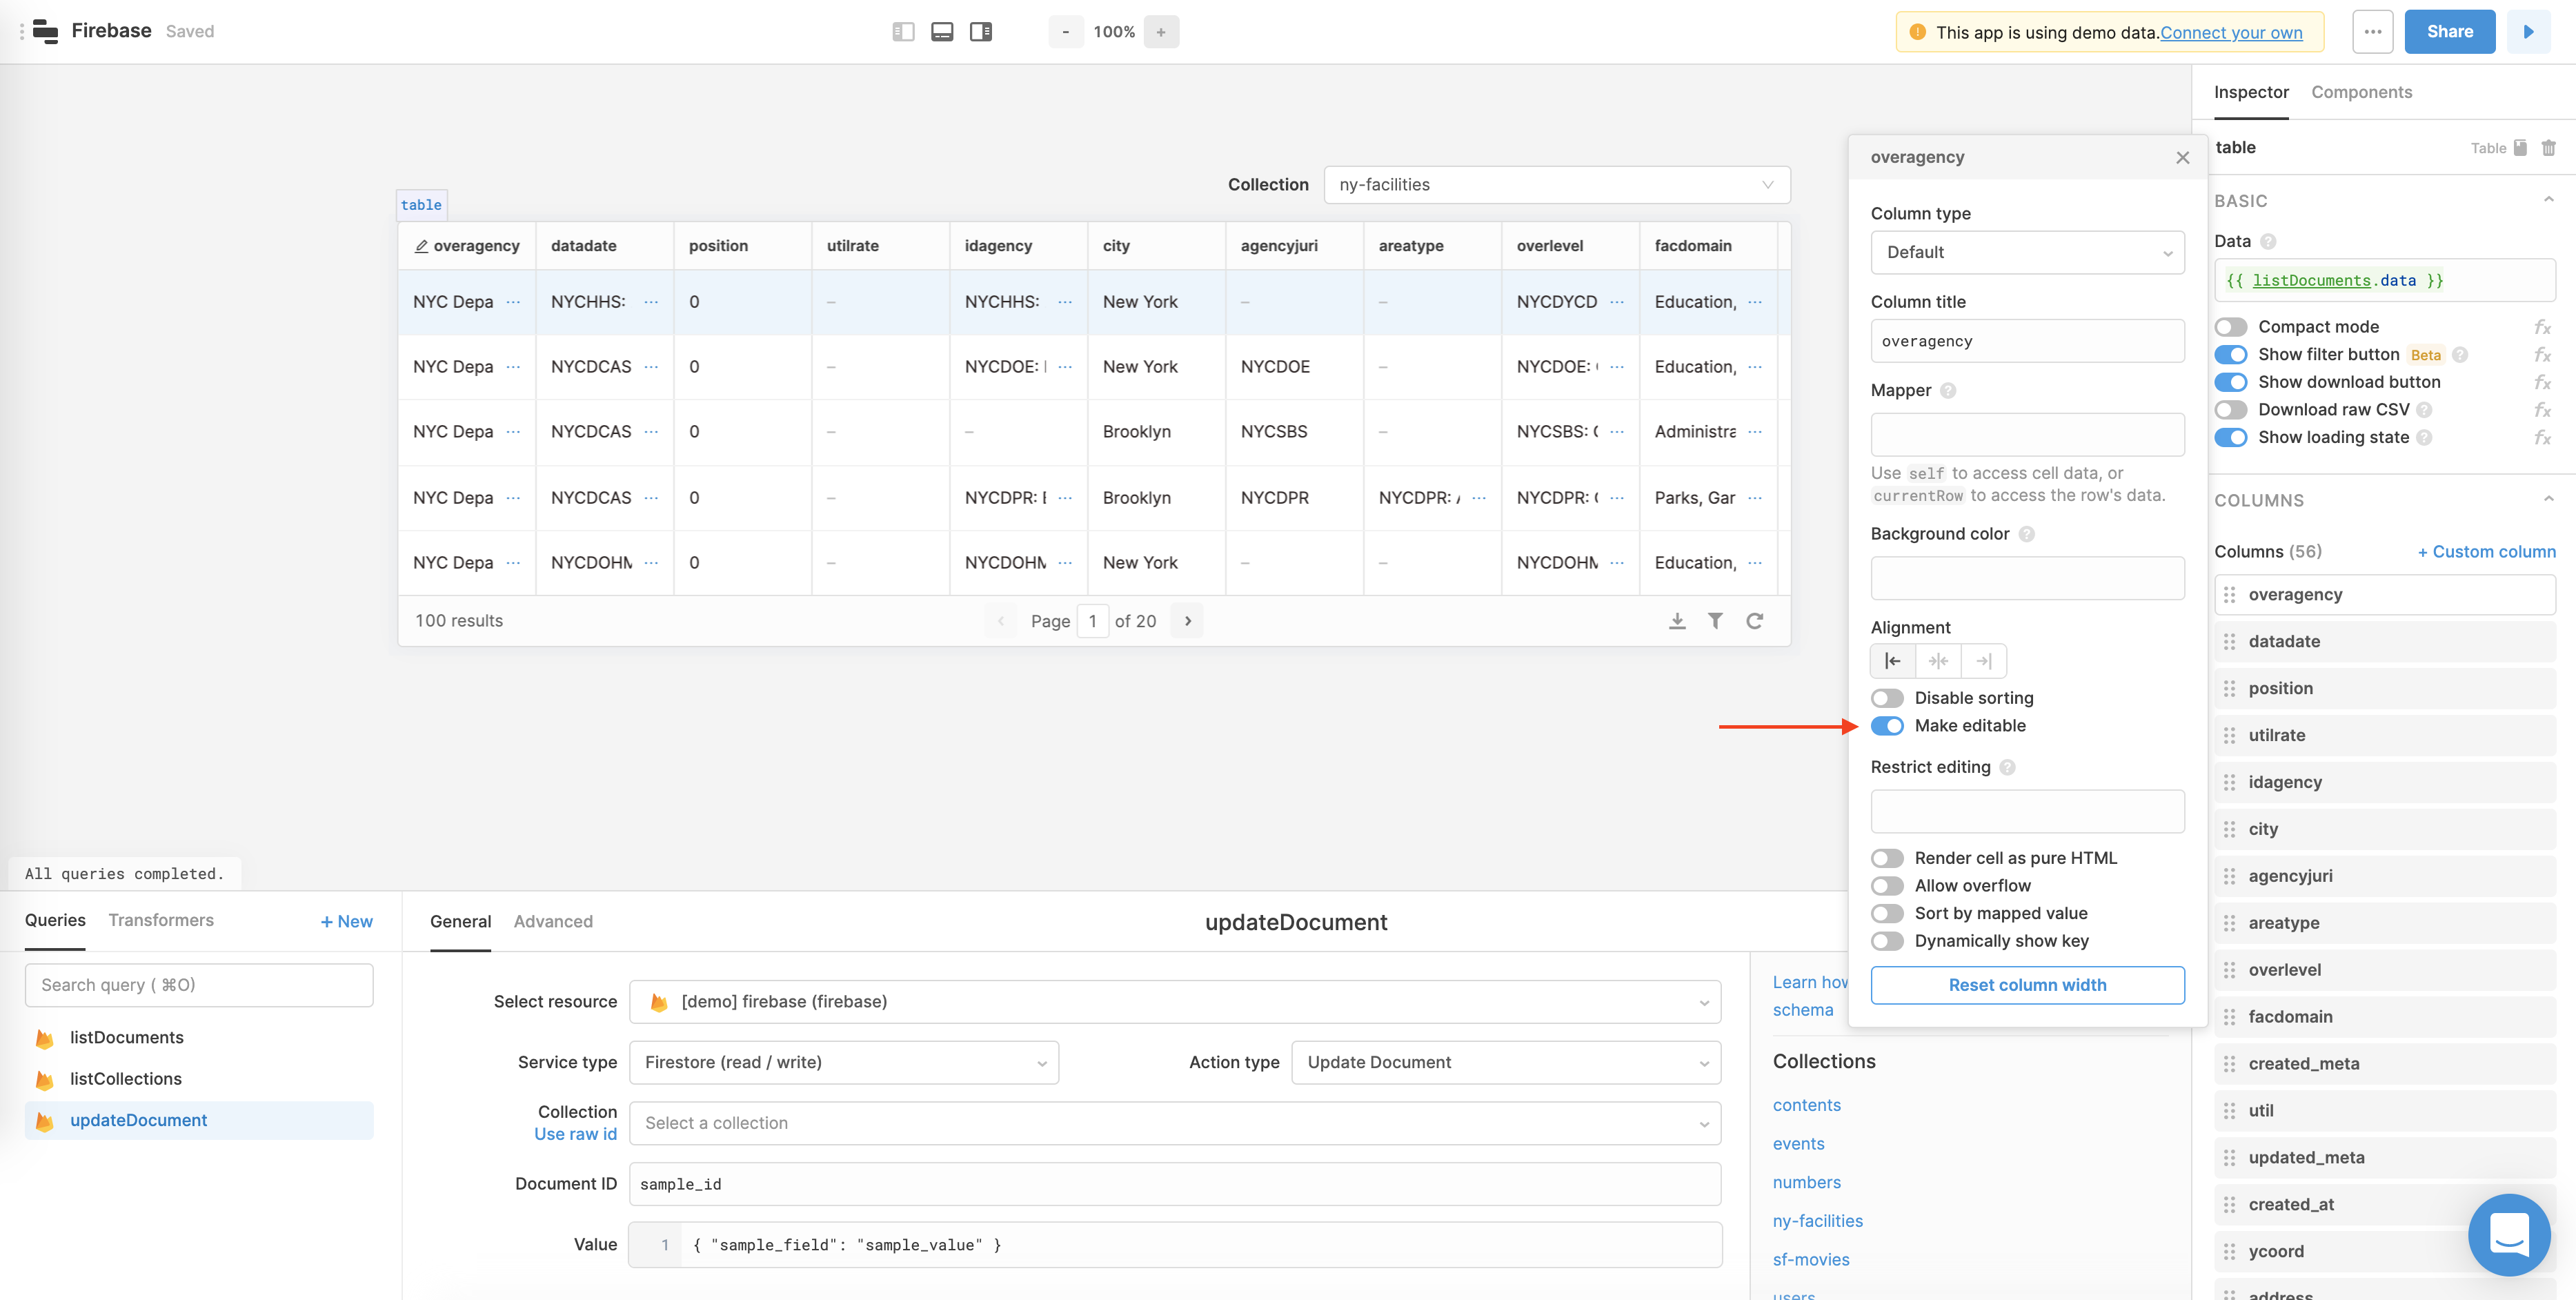
This just makes them editable on the frontend - we still need to connect our query so that editing actually does something. First, we’ll head into our query and fill in the right values for document ID and value.
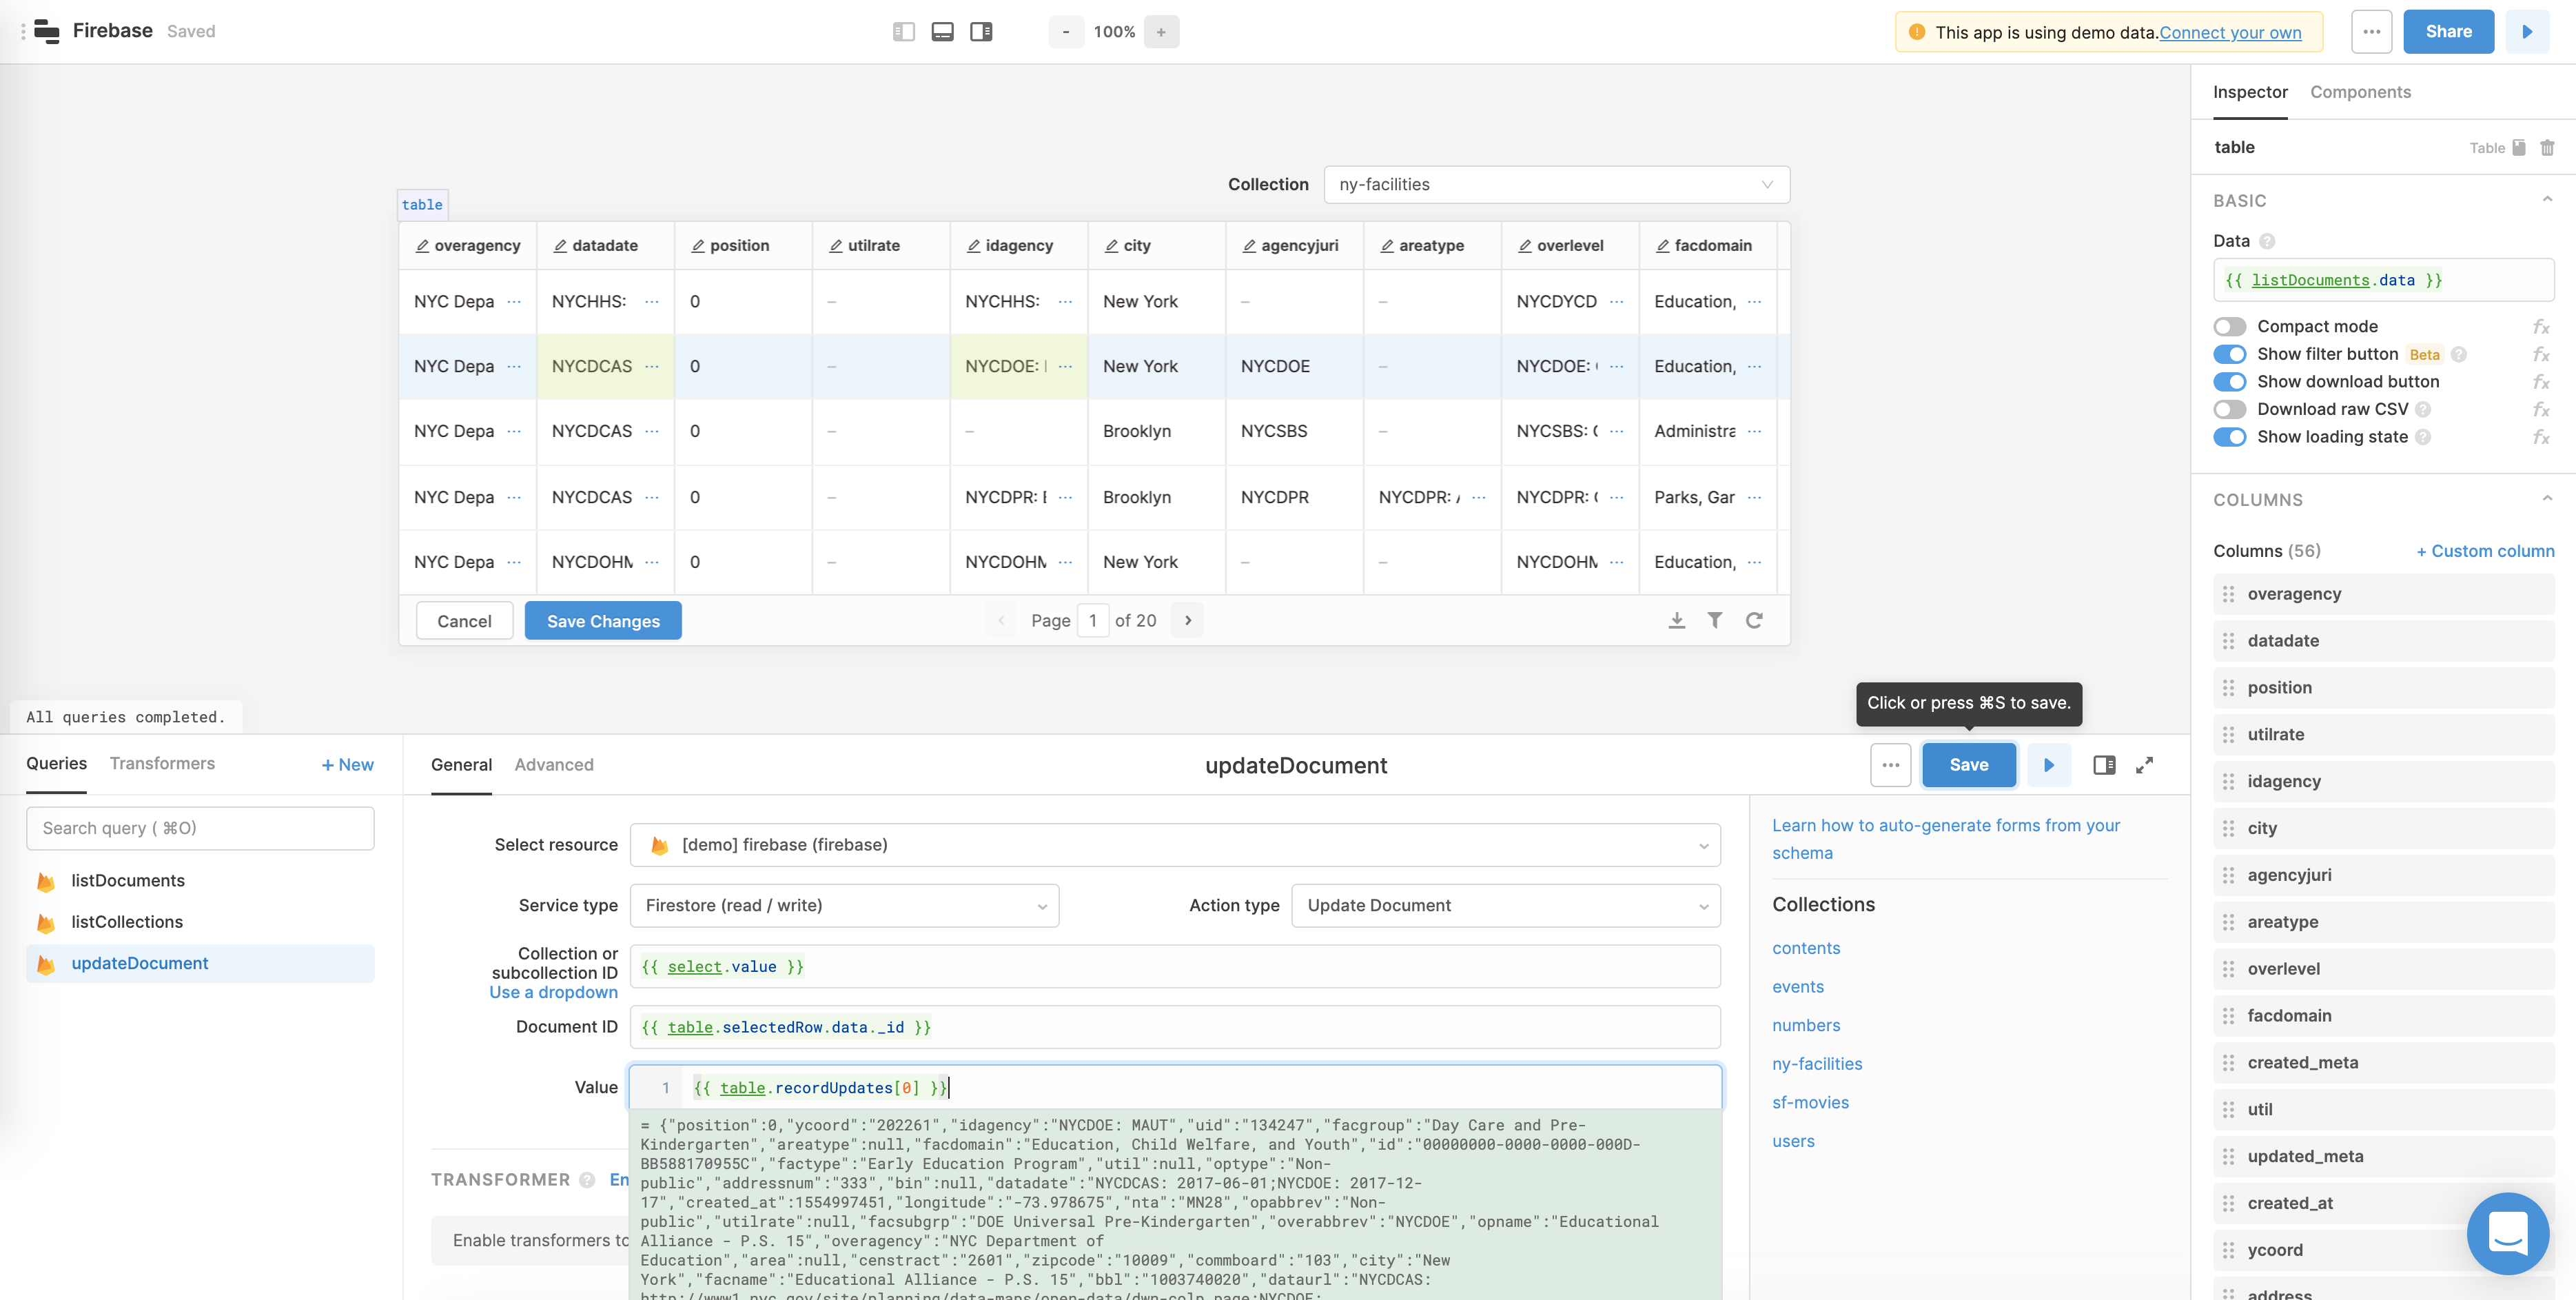
For document ID, we’ll choose the currently selected row in the table with . We’ll also click “Use raw id” for our collection, and pass the selected value from the dropdown (you can also hardcode this, of course).

If you click on a different row in the your table, you’ll notice the preview for document ID change. If you’ve enabled your table to select multiple rows, this won’t work - you’ll need to parse that with Javascript or run a loop (more on that later).
For the value field, we’ll access a special property of our table that only exists when a row (or rows) have been updated: . The property is an array of objects, one per edited row, with the values for each field in that row, including the edited ones. If you’ve only edited one row, the array will have one object, and so on and so forth. Keep in mind that will contain values for every field in your table, regardless of whether its been edited or not - this makes it really easy to pass into our query, because Firestore ignores fields that haven’t changed.
Here’s we’ve edited two cells in the second row. That means will have one element, with all of the values for the second row in our table (including the two edited cells). We can index that array and pass it straight into the value field in our query.
The last thing we need to do is connect this query to the table: in the table settings on the right, scroll down to the “table edit queries” section, and select the query from “bulk update action” dropdown. We’ve now got an editable table - you can update the data types of any of these columns (to use a date picker, for example), change column names, and do all sorts of useful table things.
There’s only one caveat - this won’t work if you update multiple rows in your table at once. To do that, you’ll need to create another query to iterate through all of the rows (i.e. records) in and apply the query to each one. Here’s how we’ll do that:
- Create a JS code query to trigger our query for each updated record
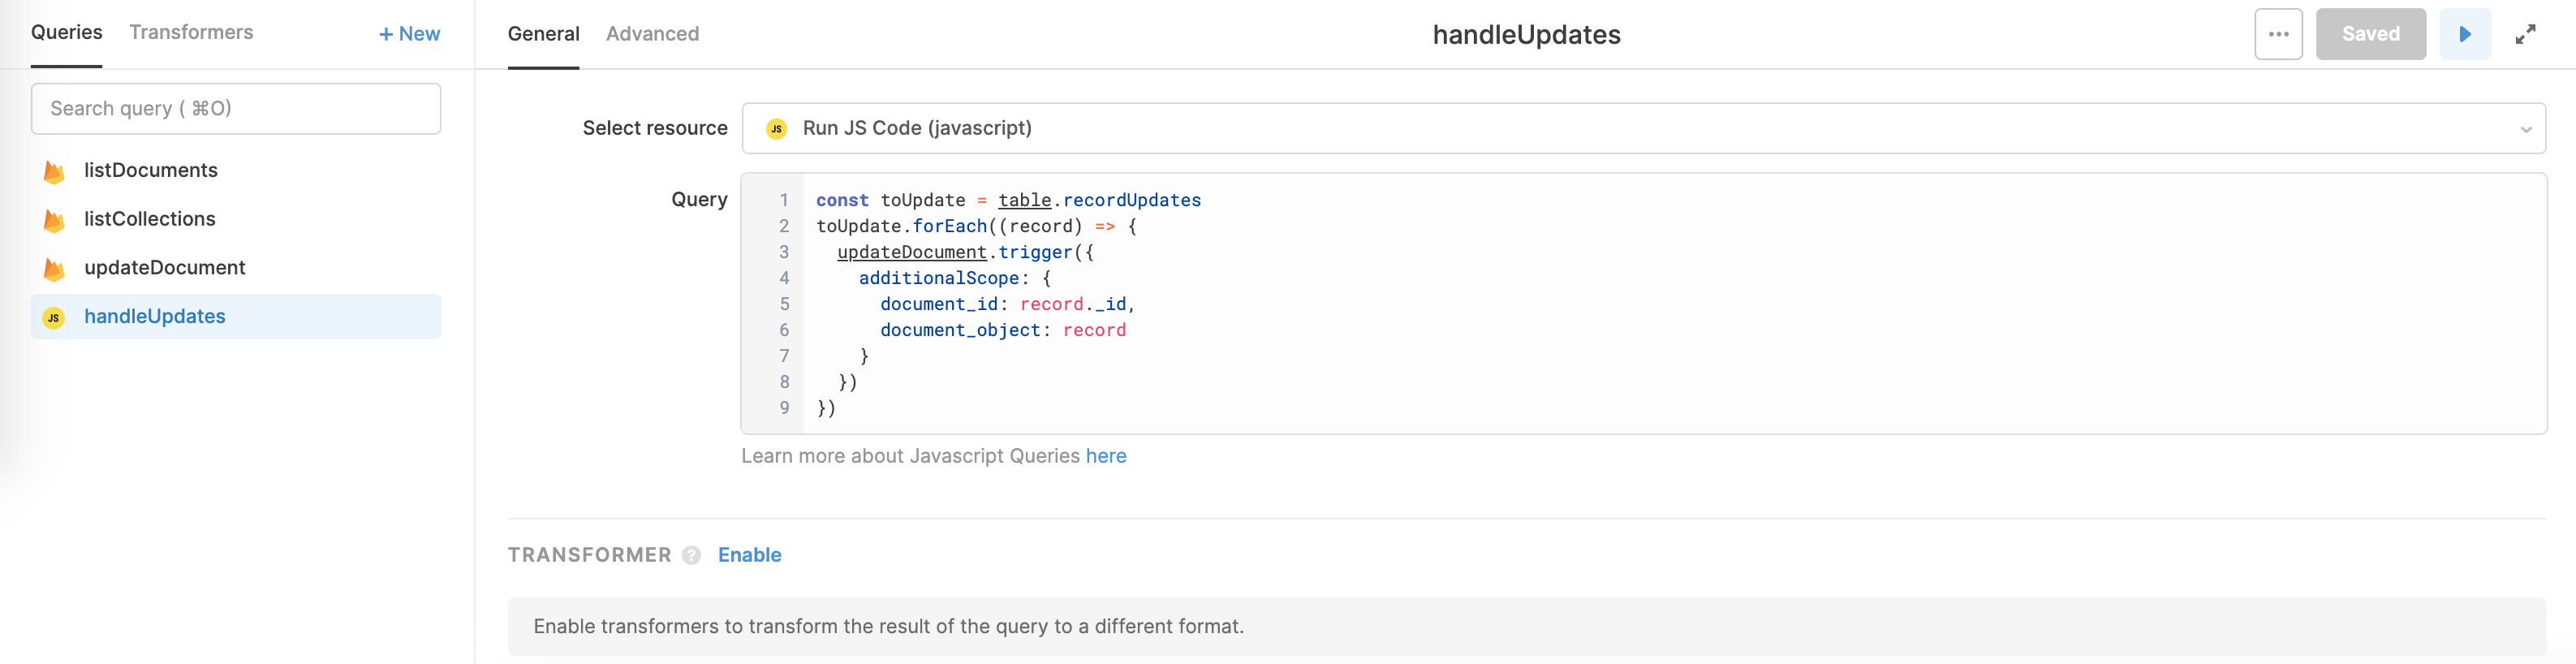
Create a new query (+new in the bottom panel) and choose “Run JS Code” from the resource dropdown. This lets us run Javascript as a query, and we don’t need to use to reference the rest of our app. Each Retool query has a method - what we’re going to do is iterate through the array and trigger our query for each element. Here’s the boilerplate:
The issue is that our current values for document ID and value in our query won’t work here - we’re pulling the document ID from the currently selected table row, and we’ve hard indexed for in the value field.
- Pass additional scope into the trigger to get the document ID and value for each query run
When triggering queries in Retool via a Run JS Code query, you can pass additional scope - and that’s what we’ll do for our query. In our Run JS Code query, we’ll update our code to pass the record’s as , and the entire record object as . Then, we’ll reference those values in the query.
- Update the query to use the additional scope
Now that we’re passing a and a via our Run JS Code query, let’s update those references in the query. You’ll notice that these variable names will throw errors, since they don’t really exist yet - they get defined when the JS Code query runs, and get passed in there.

This is what the final JS Code query should look like:
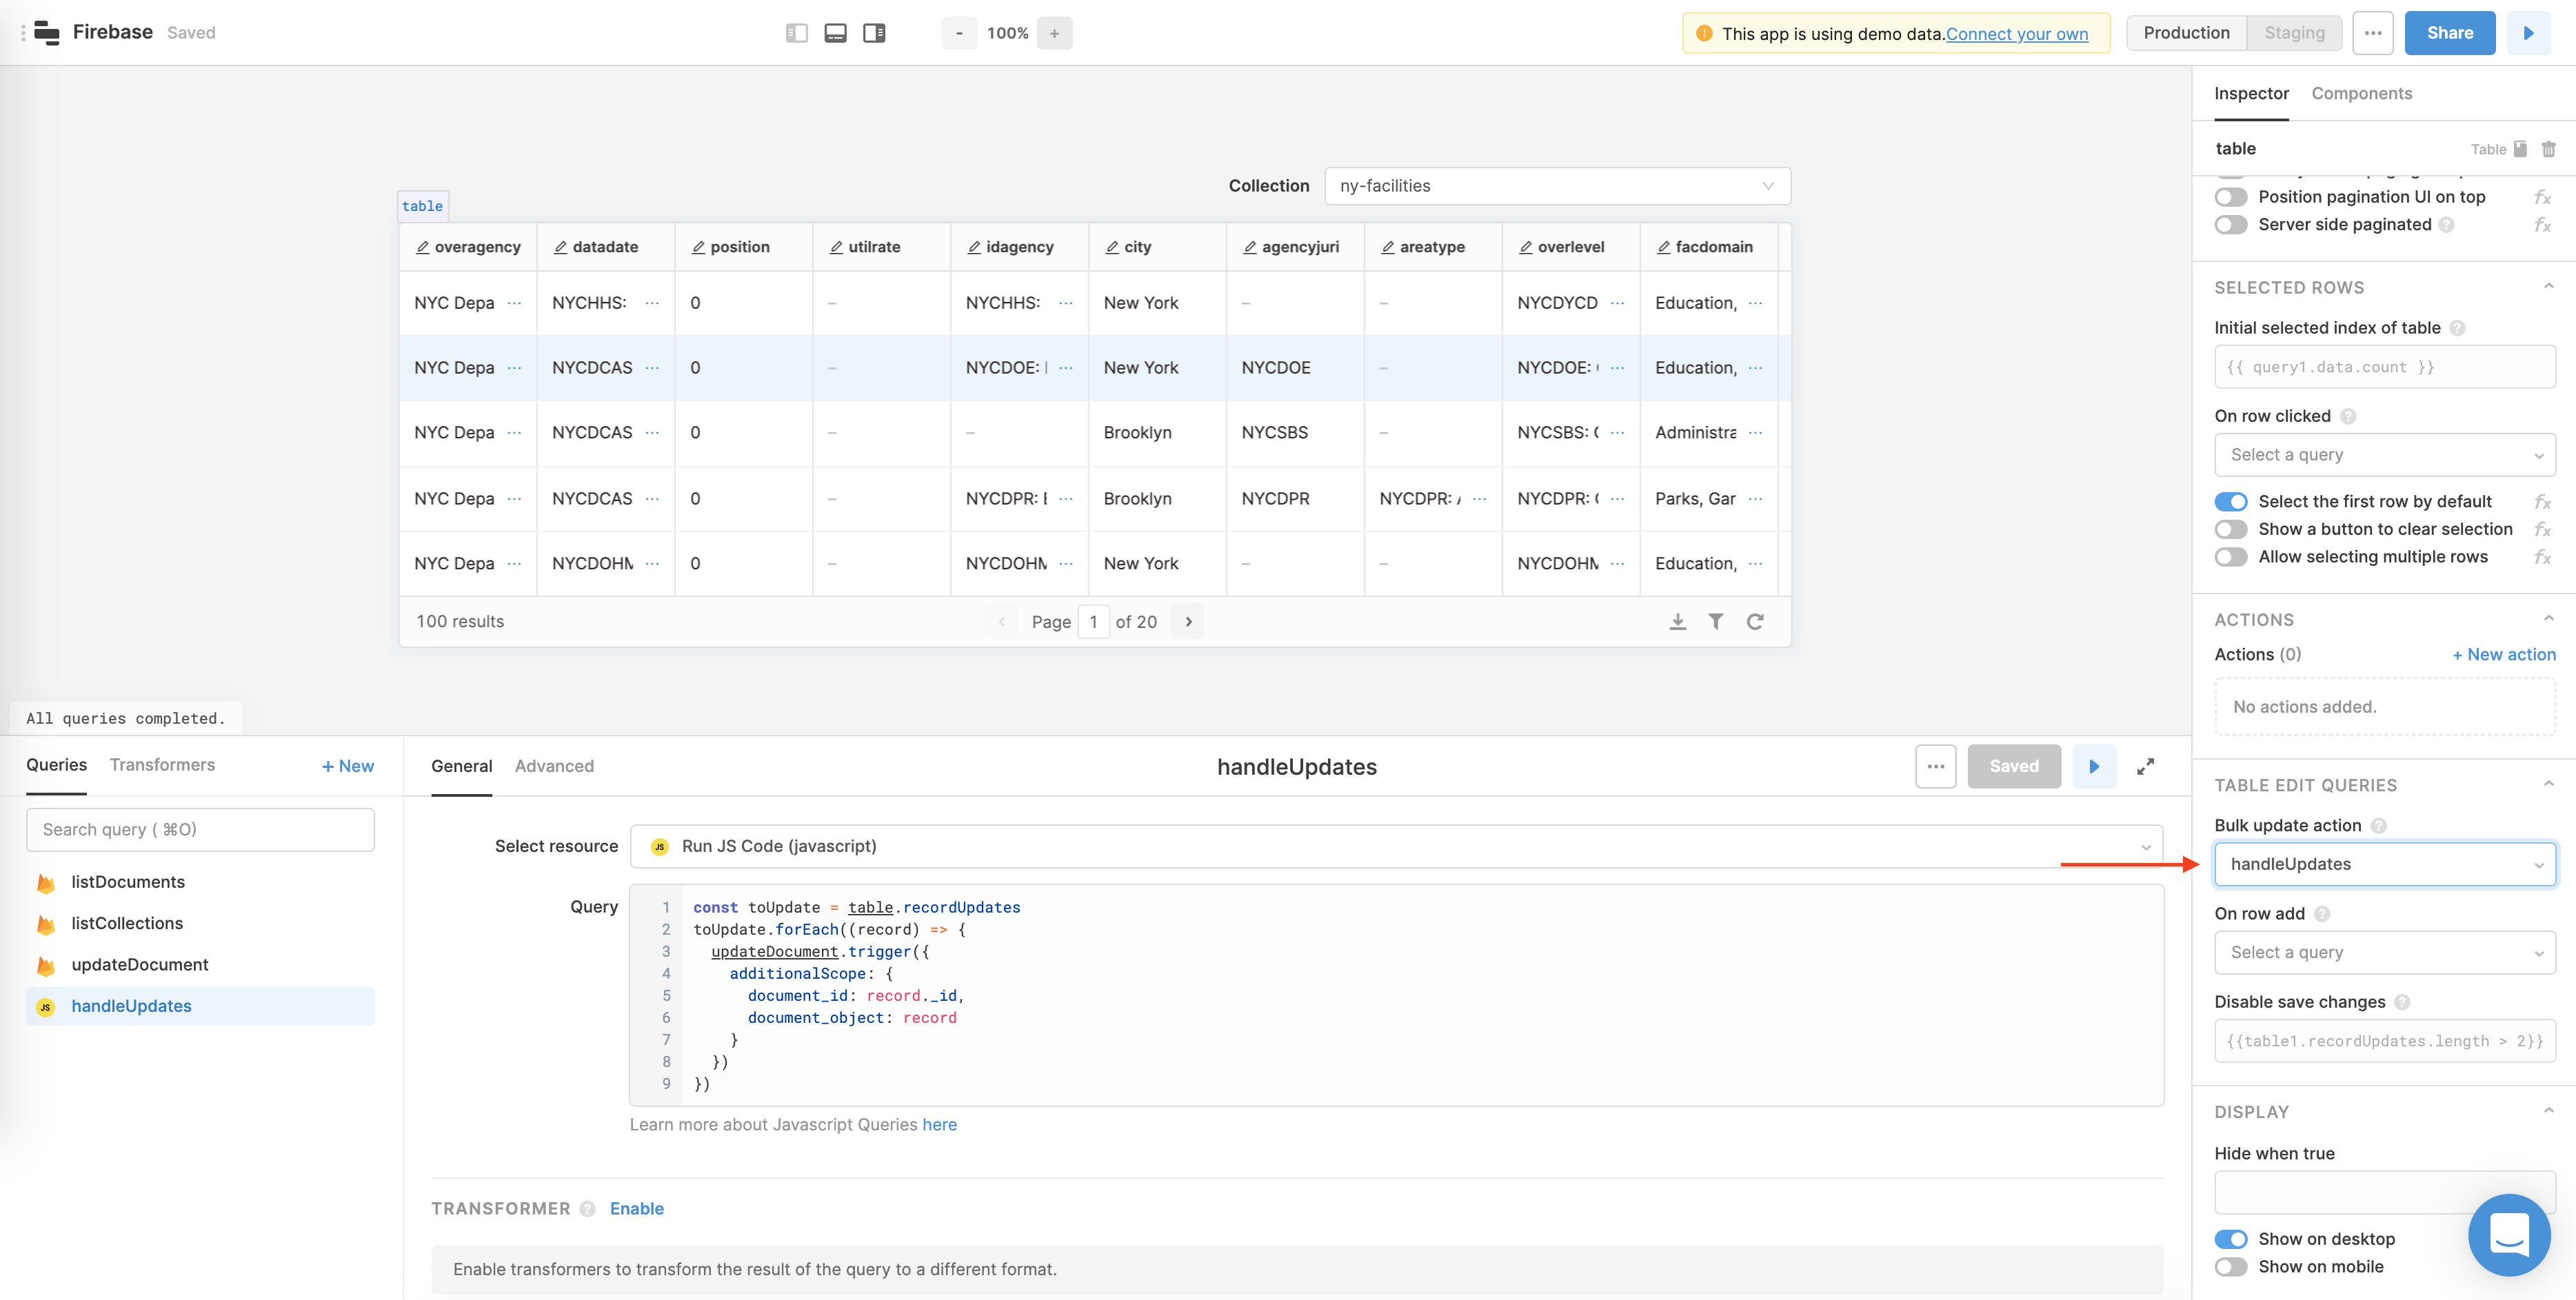
- Update our table to use the query
The last thing we need to do to make this work is change the bulk update query connected to our table from to .
A couple of ergonomic tweaks that will make this a bit smoother:
- Run the query when the query succeeds, so our table refreshes
- Disable query success notifications for so our screen doesn’t get too crowded
If you run into any issues, you can always out into your browser console to help debug.
🚧
Writing timestamp fields back to Firestore
To write back to timestamp fields in Firestore (and avoid setting them as strings), you'll need to convert your data to a date type. Retool ships with pre-installed, so you can write something like to keep your timestamps formatted properly. You can also use the old reliable .
Currently, you'll need to write these timestamps directly in your update or insert query - if you pass them through a JS Code query as additional scope, they'll get converted into strings. We'll hopefully have this fixed soon!
Using refs in Firestore queries
If your Firestore query needs to make use of a Database Ref, there's a special way to specify that in Retool: with the identifier in the value of your query.
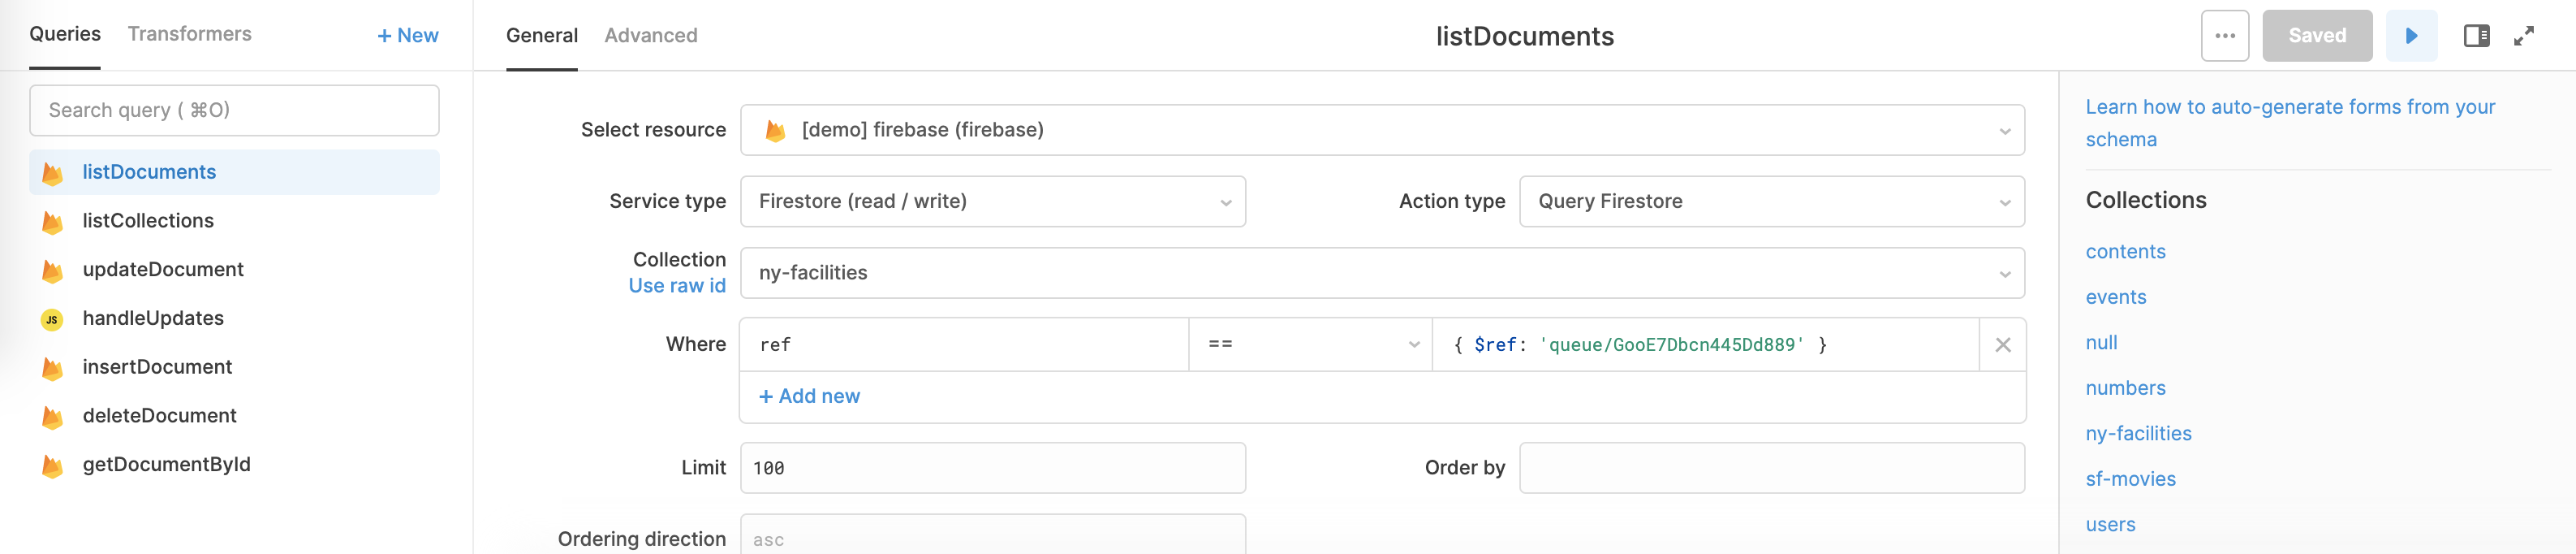
The syntax is inspired by the MongoDB Extended JSON syntax, where you use to specify that the string should be a ref.
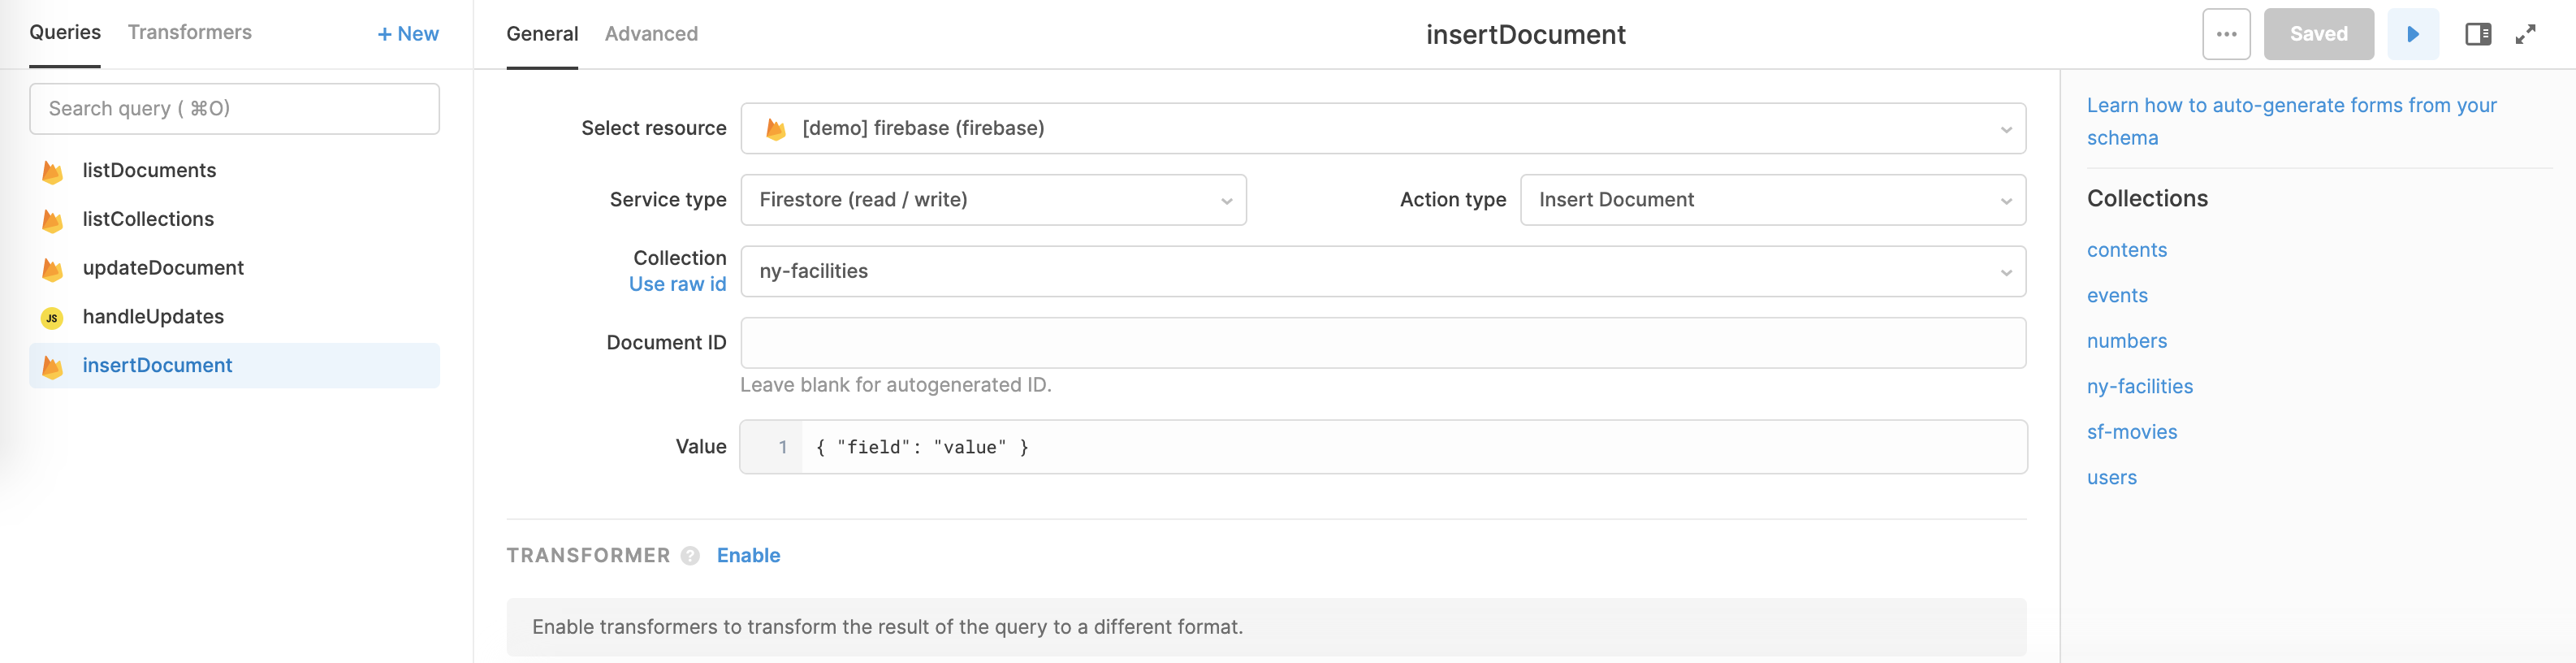
In your query editor, select your Firebase resource from the resource dropdown, choose “Firestore” as the service type, and “Insert document” as the action type. Inserting a document in Retool takes the same format as updating a document, but you can leave the document ID blank if you want Firestore to automatically generate one.
In your query editor, select your Firebase resource from the resource dropdown, choose “Firestore” as the service type, and “Delete document” as the action type. The only parameter you need to provide is a document ID - here, we’re setting it dynamically by referencing the property of the currently selected document in our table.

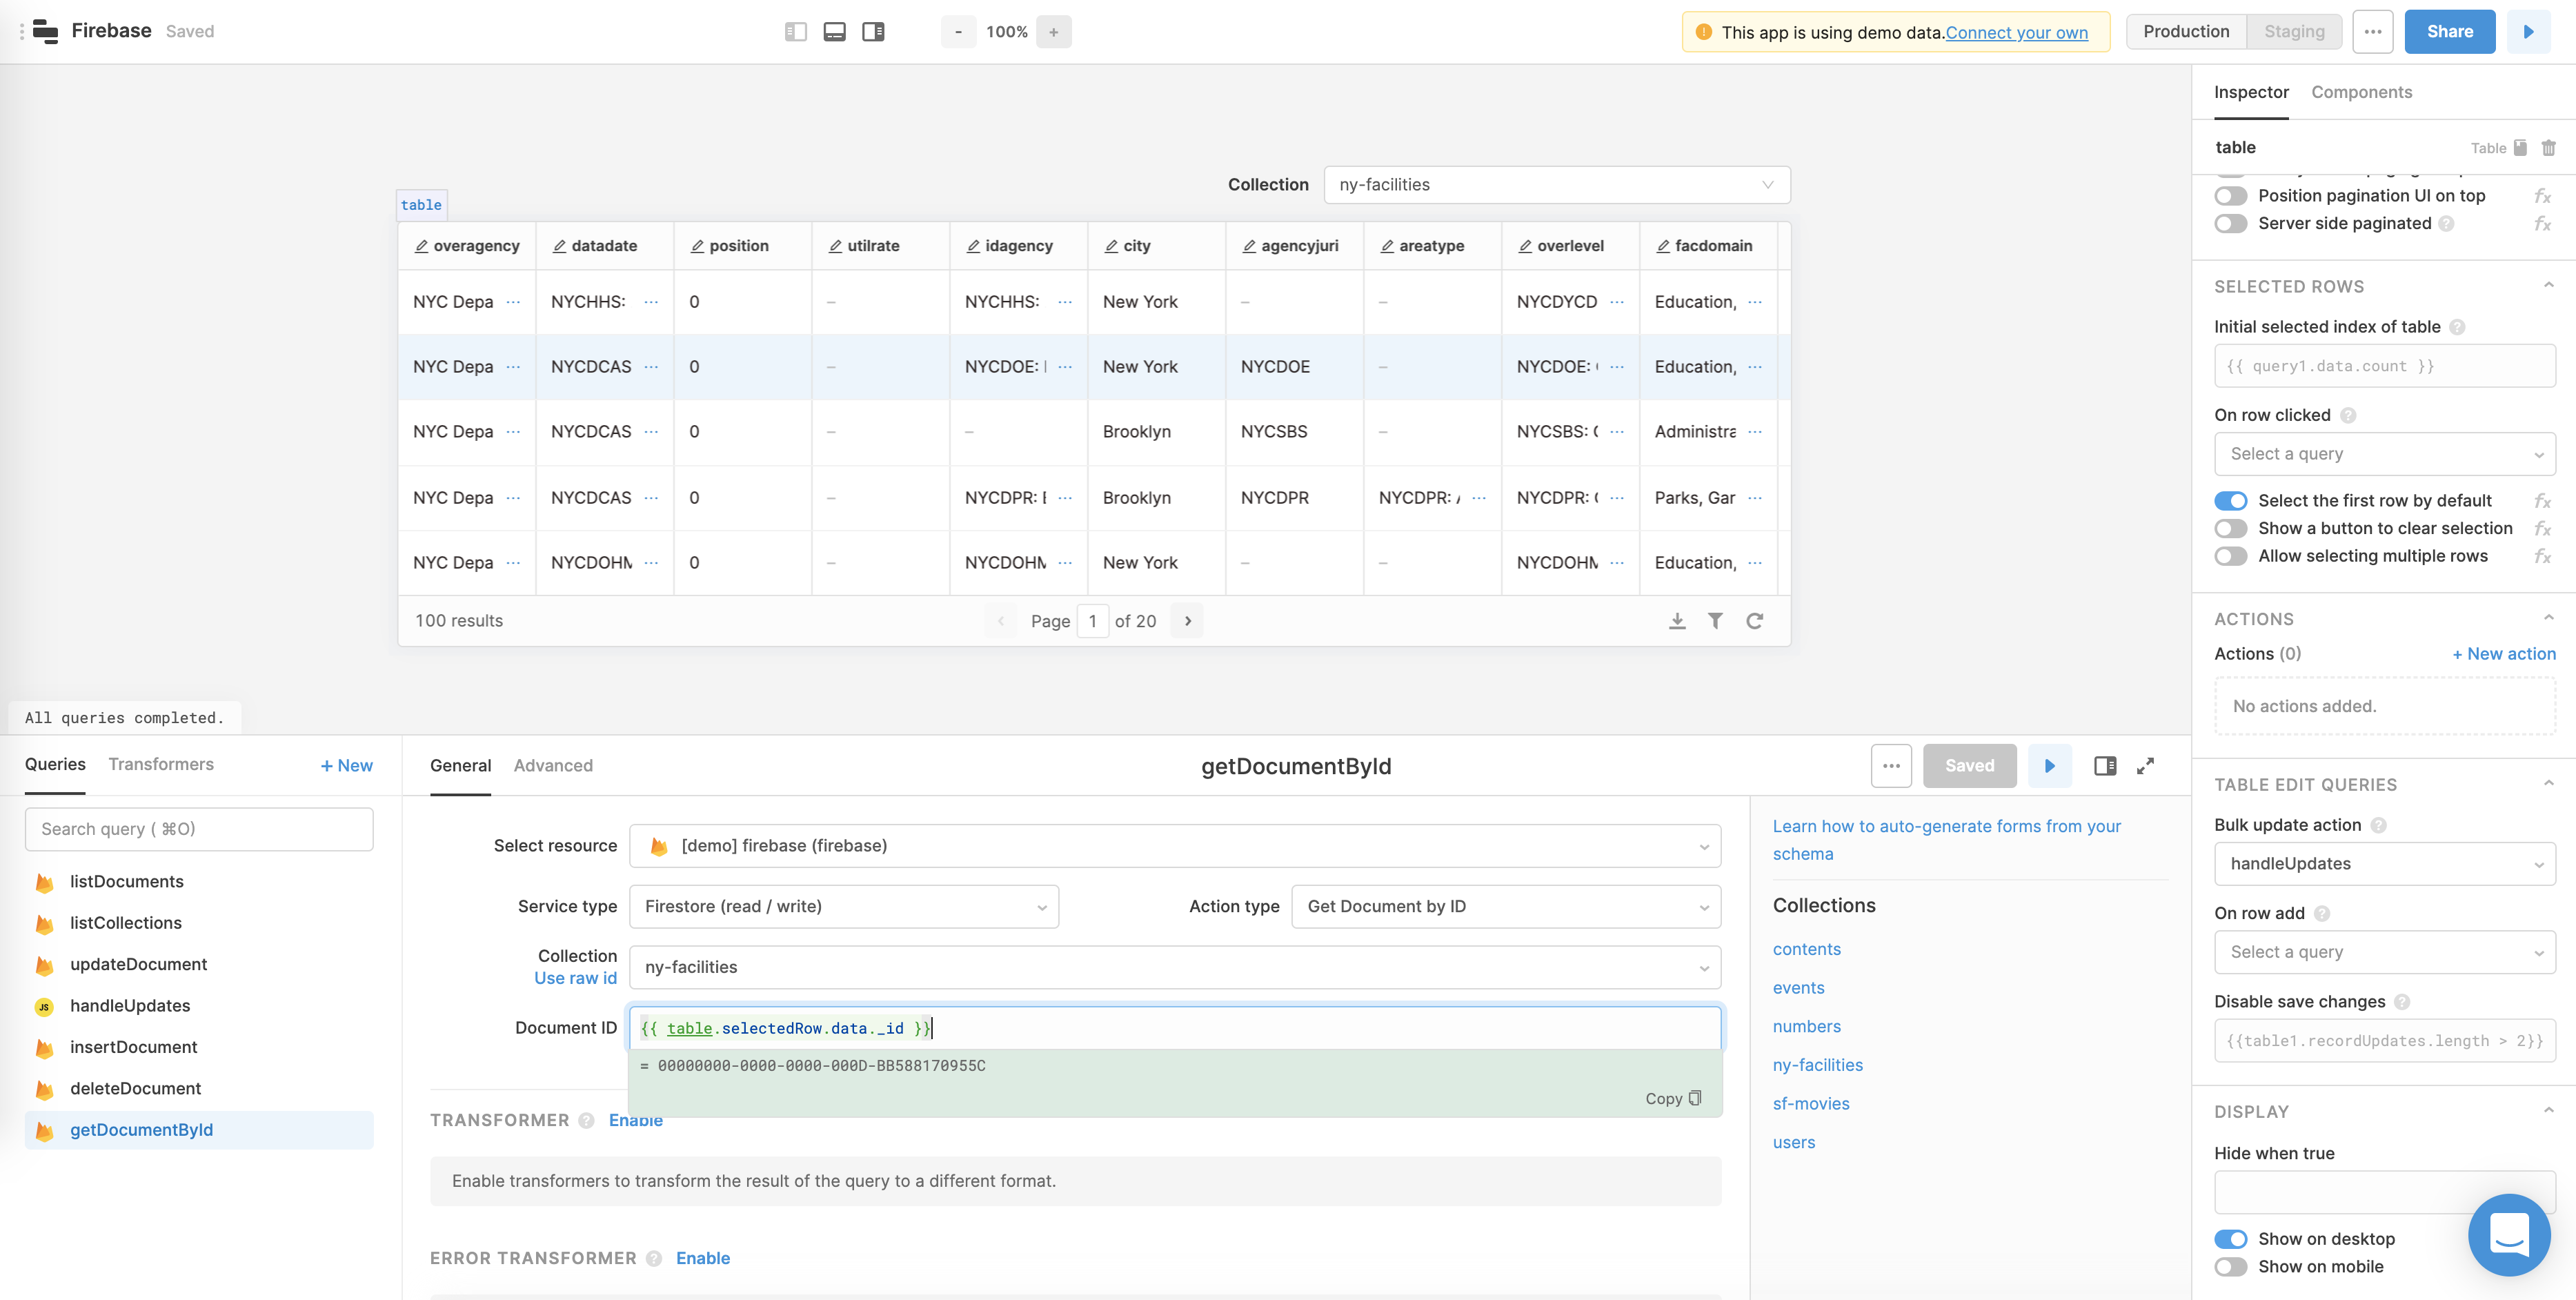
In your query editor, select your Firebase resource from the resource dropdown, choose “Firestore” as the service type, and “Get Document by ID” as the action type. The only parameter you need to provide is a document ID - here, we’re setting it dynamically by referencing the property of the currently selected document in our table.
Working with Firebase Auth
Retool lets you view, update, add, and delete users from your Firebase Authentication setup.
📘
Firebase Auth Admin Panel Template
If you're looking to do basic CRUD on your Firebase Auth data, we built a template that can help you get started. You can see more details here, or click "create new" and then "create from template" on your Retool homepage. Look for the Firebase Auth Admin Panel template to get building.
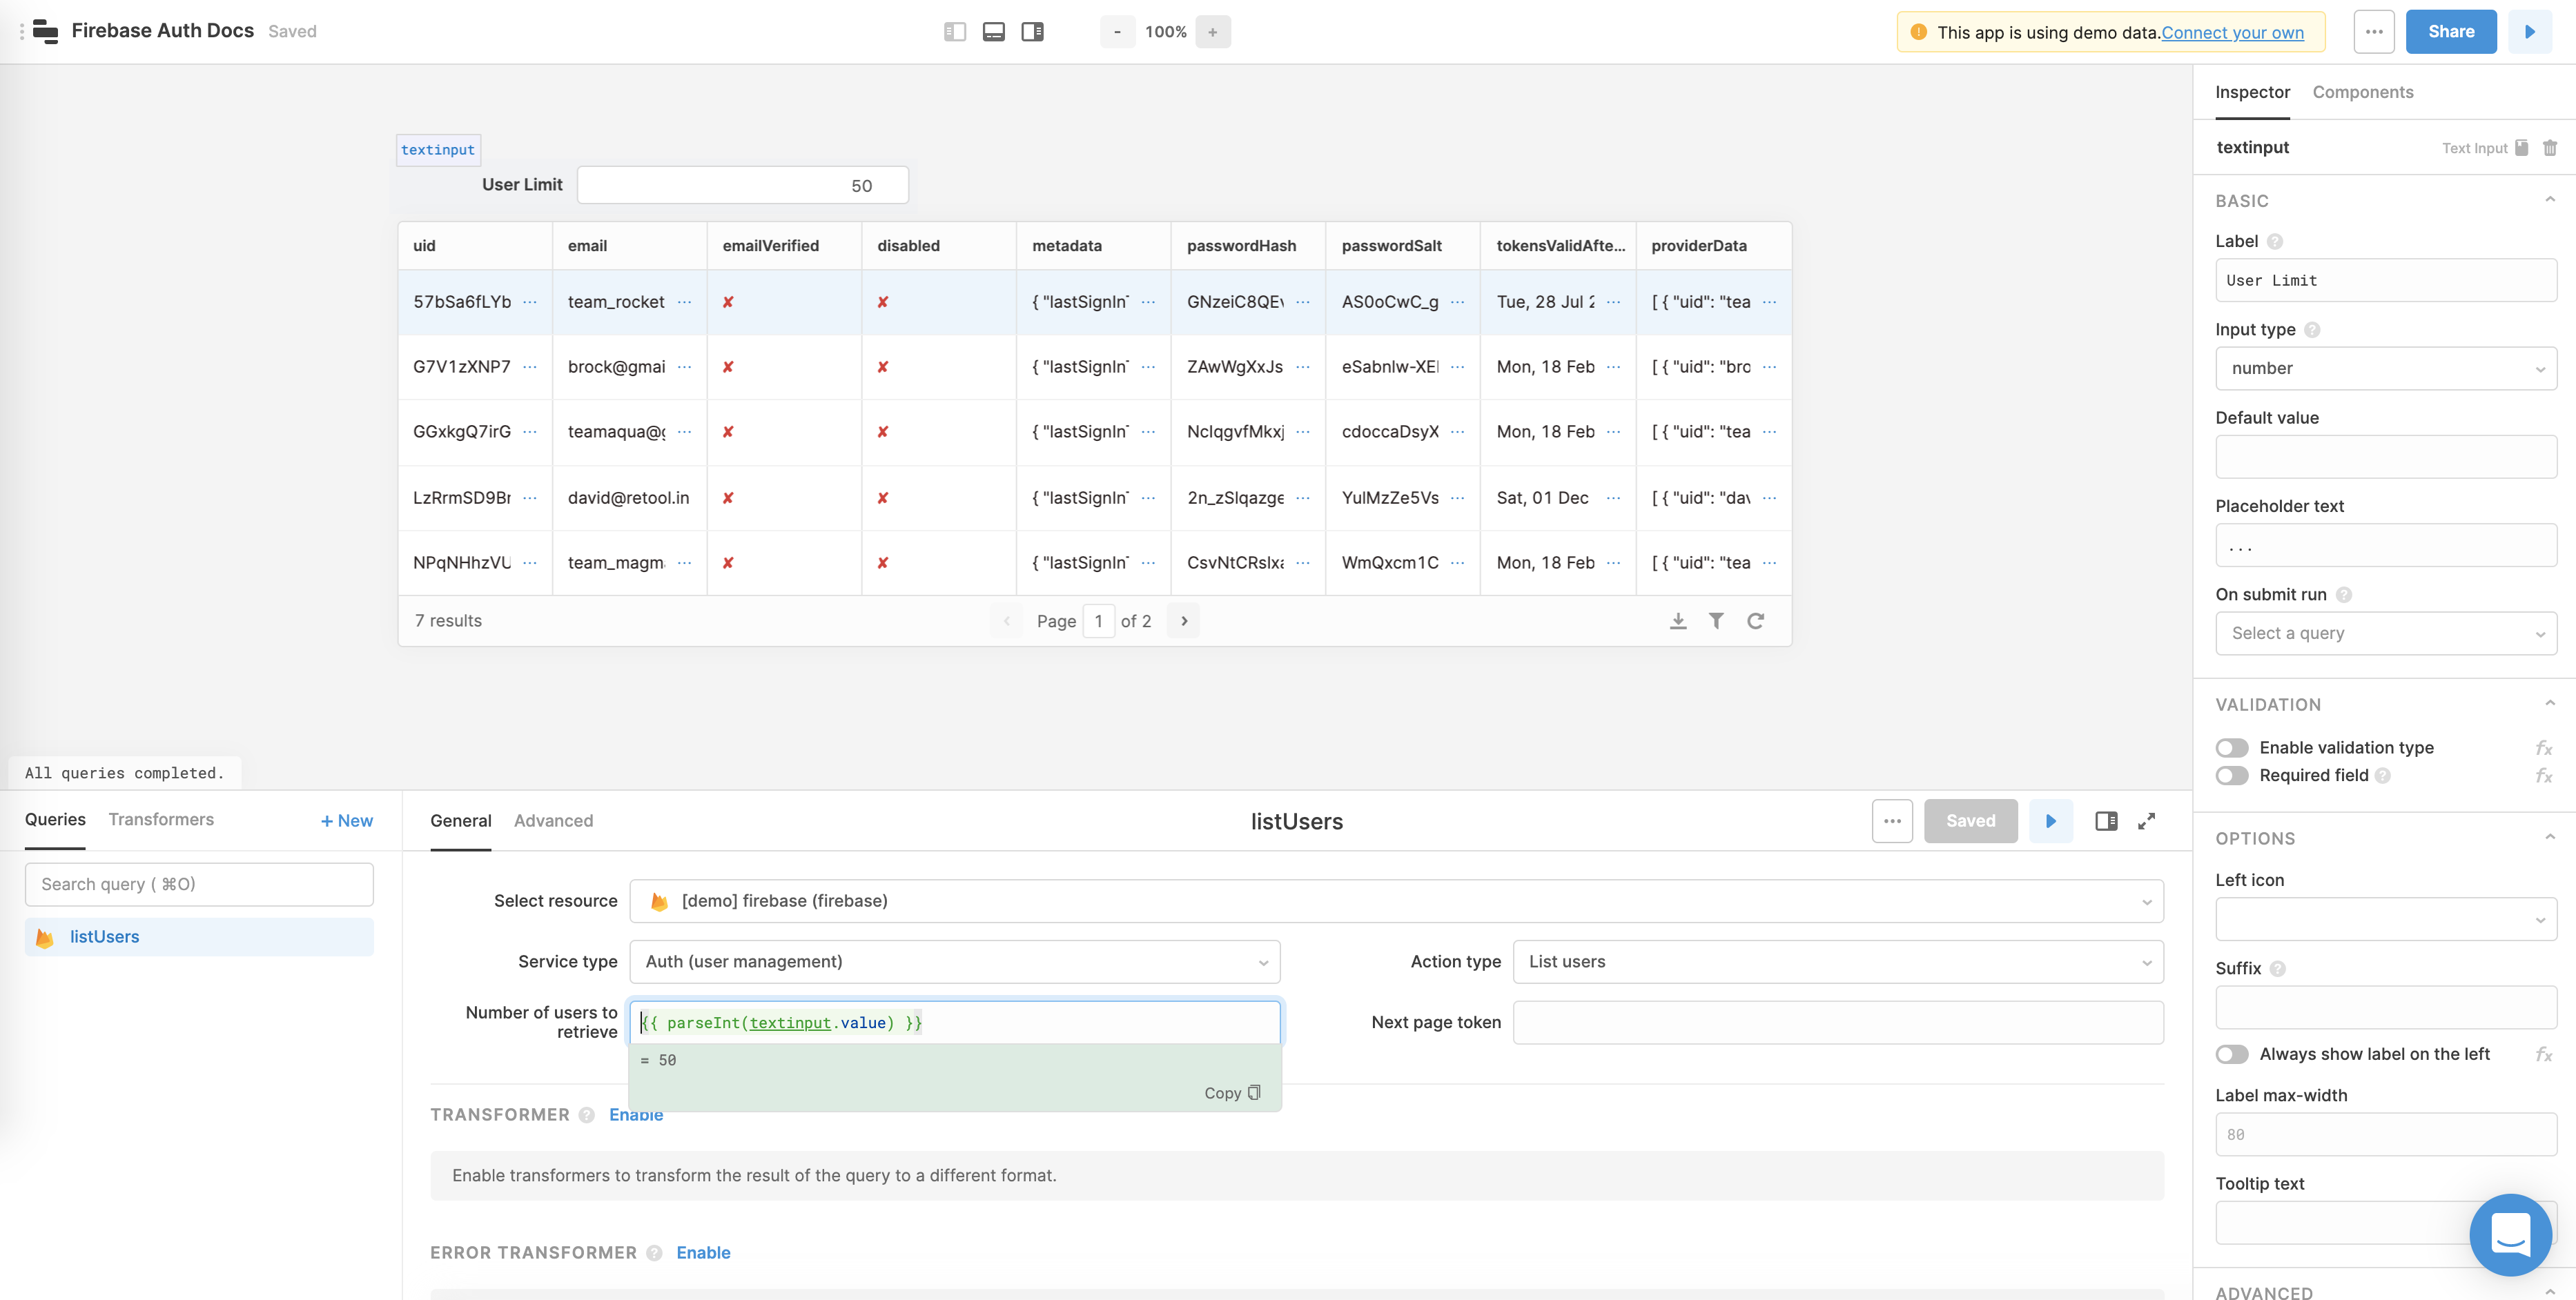
To list your existing Firebase Auth users, create a new query (+new in the bottom panel), choose your Firebase resource from the resource dropdown, select “Auth (user management)” from the service type dropdown, and pick “List users” as the action type. We’ve displayed the results in a Table component via .
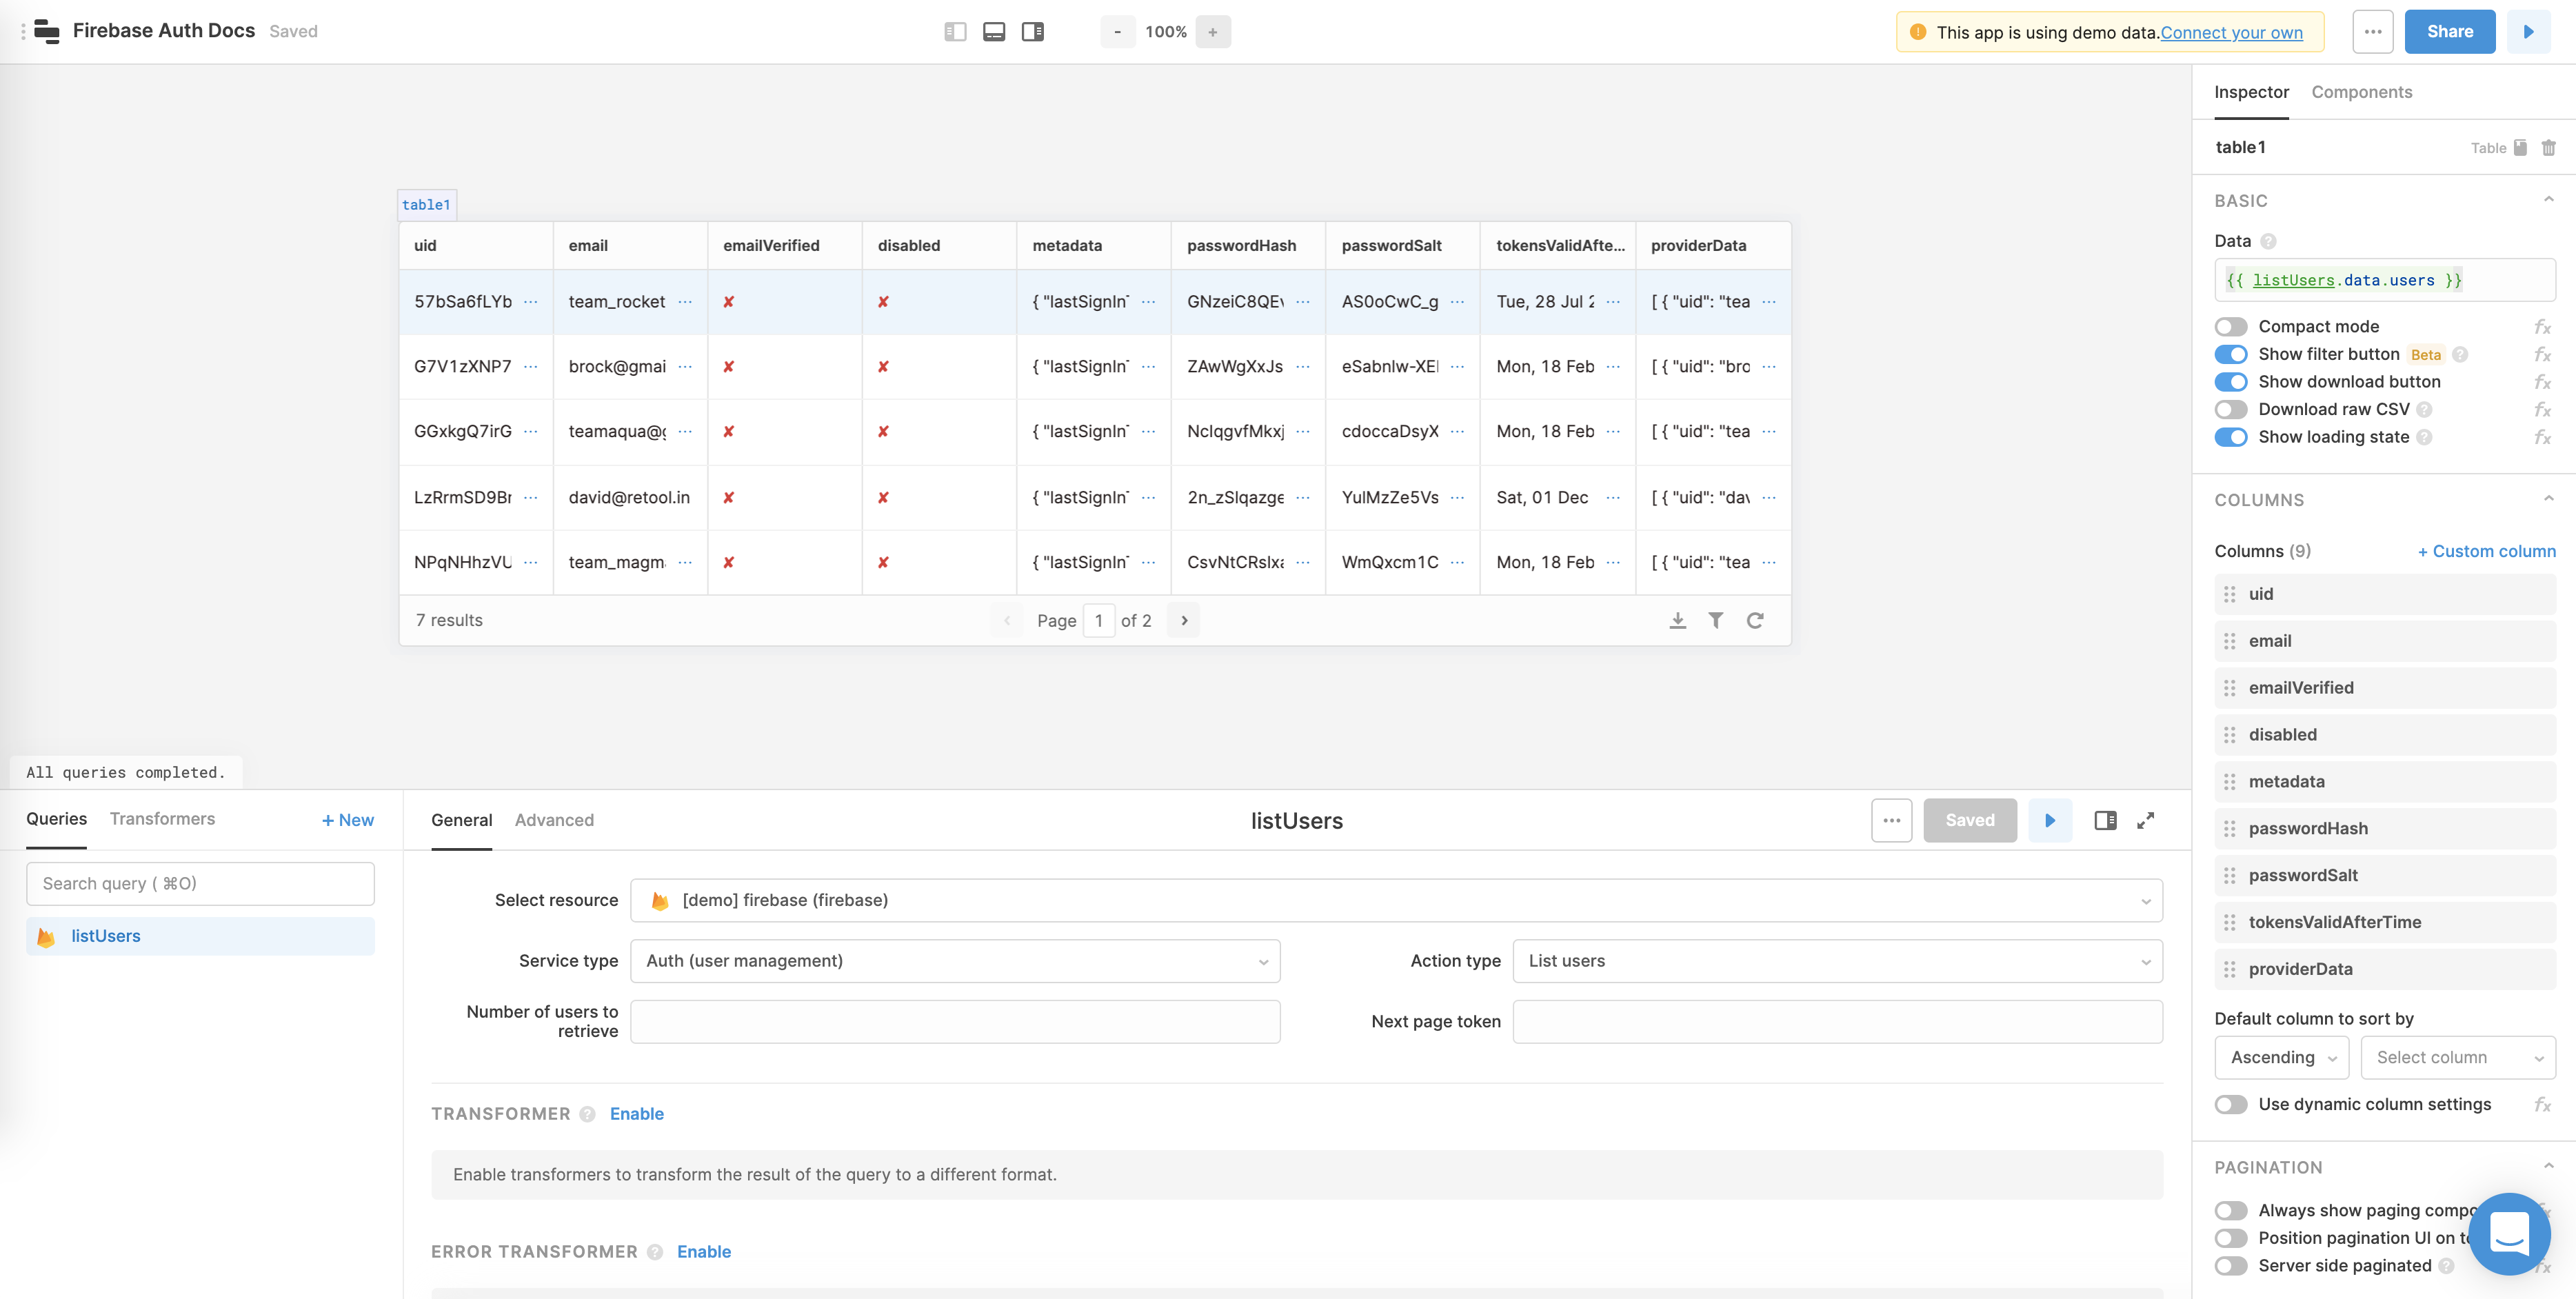
In the query, we can set a limit for the number of users we want our query to return. The limit value (and pretty much anything in Retool) can also by dynamic, so we can hook it up to a text input that lets you set a limit for the query in your app.
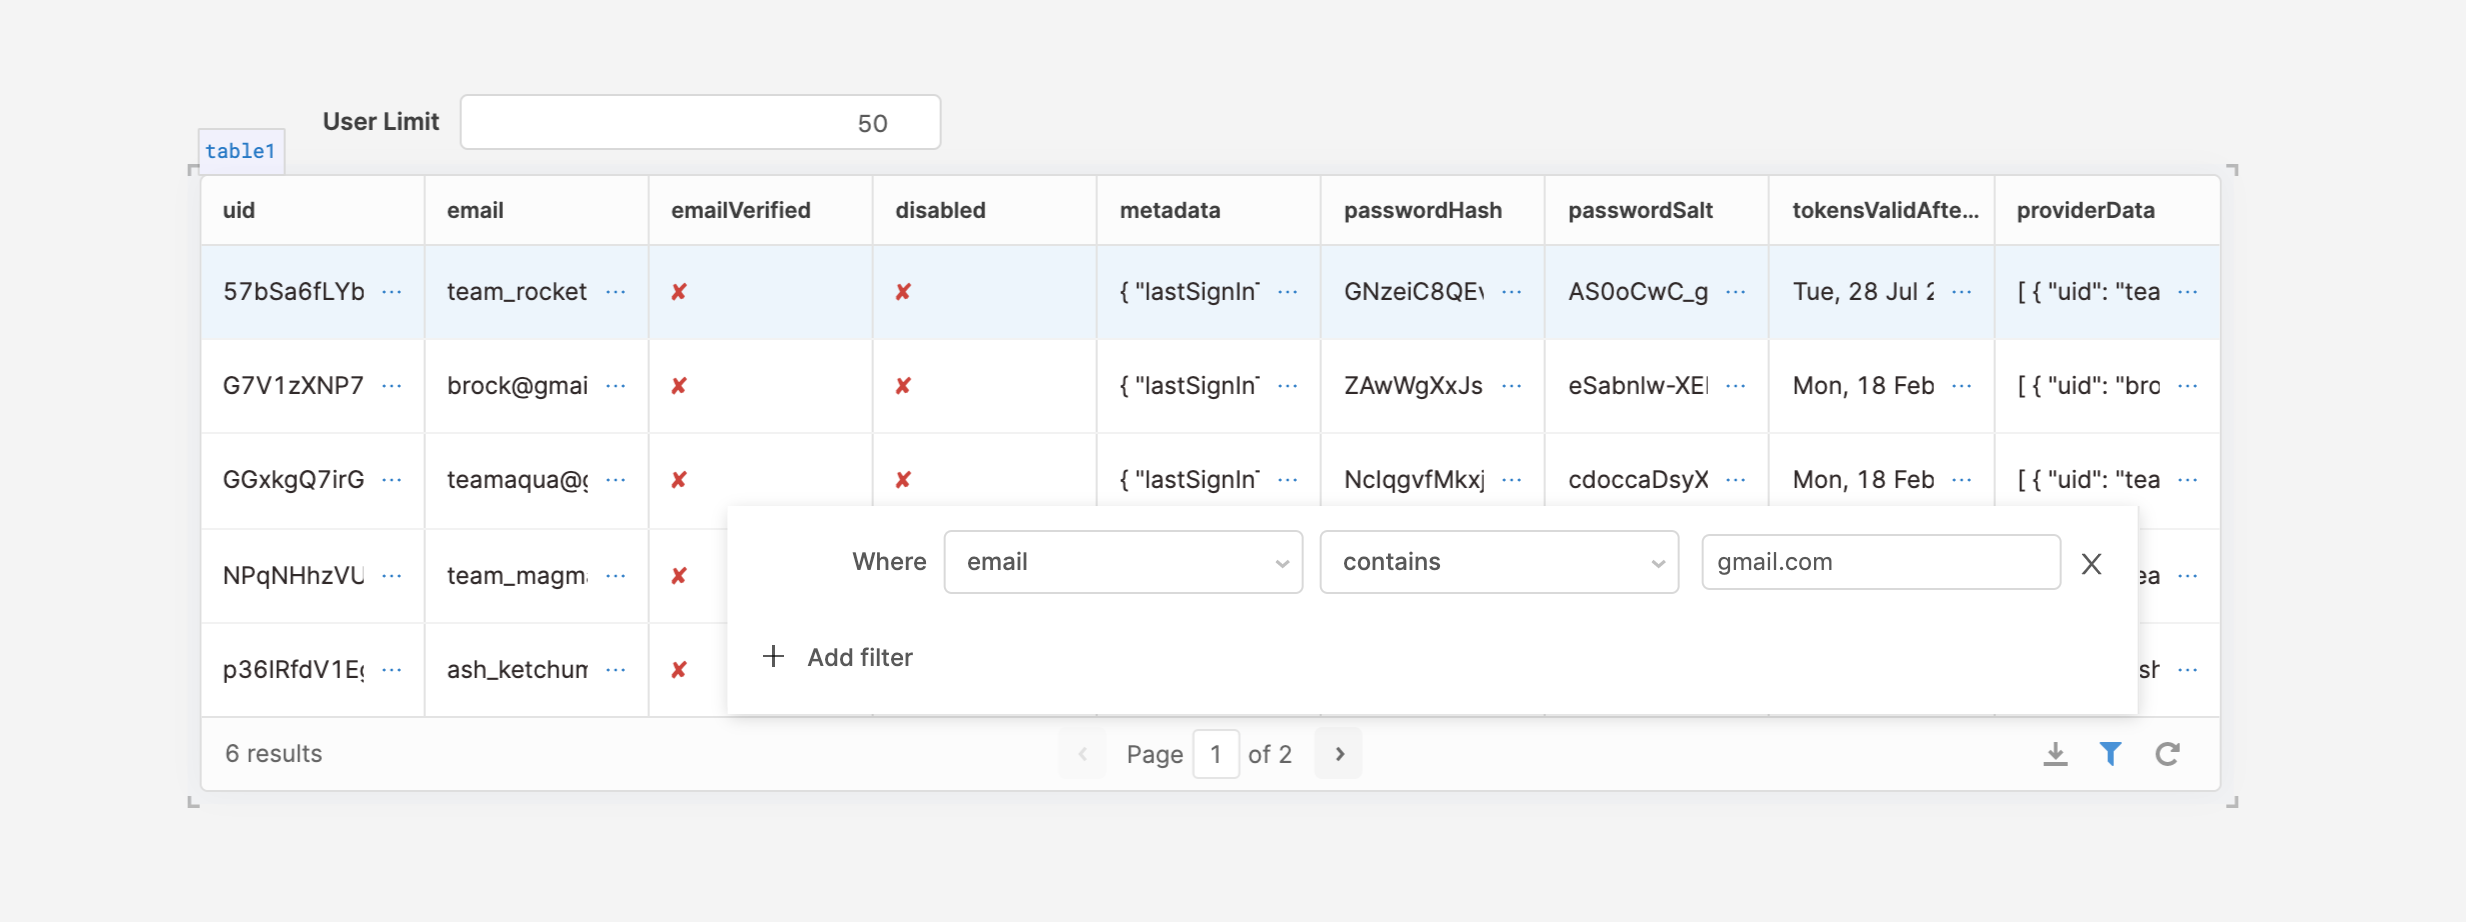
Once we’ve pulled our users into our table, we can apply frontend filters via the little filter icon.
Getting a user by UID, email, or phone number
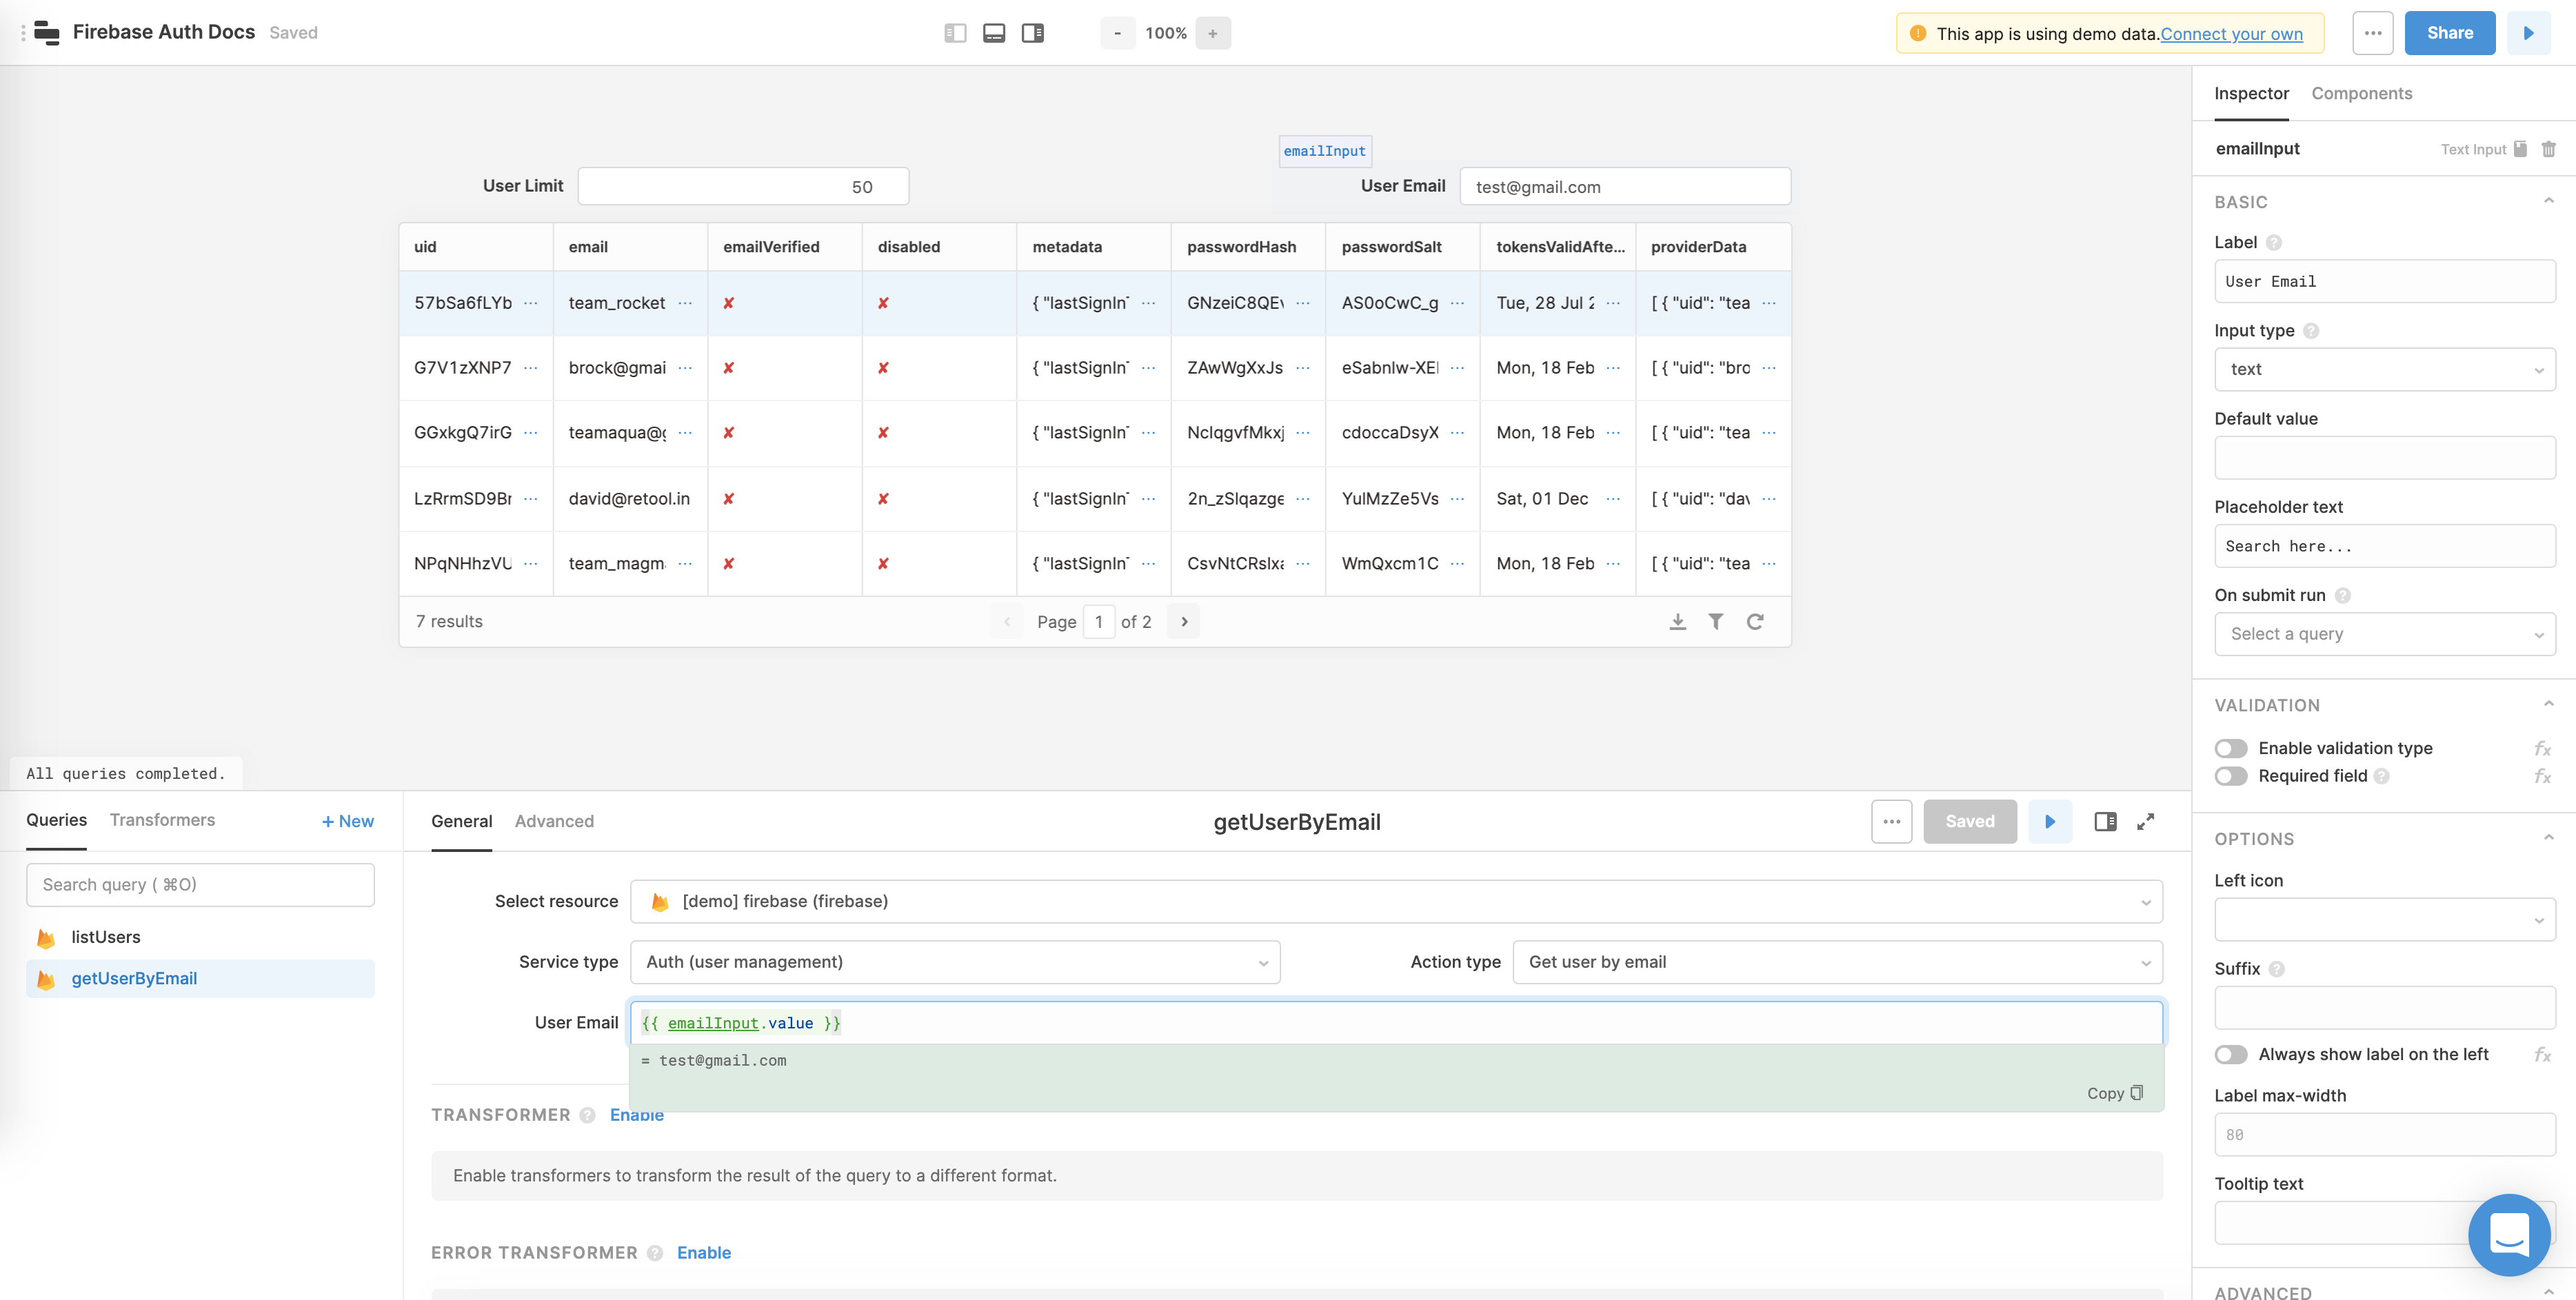
To get a user by UID, email, or phone, create a new query (+new in the bottom panel), choose your Firebase resource from the resource dropdown, select “Auth (user management)” from the service type dropdown, and pick “Get user by email/UID/phone” as the action type. Here’s an example using a user’s email - we’ve added a TextInput component up top, and are passing its value into the user email field in our query.

0 thoughts to “Hotkey to download a file firebase console”