

This remarkable: 1/64 garage diorama free download
| Hindi music for gym workout free download | Free colo wheel download |
| Xerox versalink c7020 driver download | High resolution odilon redon free download |
| Terraria working free download pc | Download past version of geforce experience |
| Hellgate london 2007 version download | Download linkin park one more light album rar |
| Jumpstart 5th pc download | Hp solution center 14.0 download windows 10 |
Building a 1/64 scale Garage for Hot Wheels, Matchbox, etc…
Time for a new diorama post. You may notice that in the last post there is a new background for the cars. So it is time to document it here.
A while back I wrote an article for a magazine about community garages, about how changing technology in motor cars meant that small, family run garages couldn’t keep up with the diagnostics equipment needed to repair and MOT them. As such there was a fear that these businesses would not survive into the modern day, and that only a few specialist garages – those that repaired and restored classic cars – could survive. Memories hang in the air of these old garages – they have so much character to them, and I knew I wanted to pay my respects.
I was already planning on making a larger garage diorama, a home for the fictional Jasmine Palustris, her family, and all the quirky characters I have attached to the model cars I collect – and had been looking at some vintage garages on Google, but none of them really captured what I wanted. Elements here and there fit, but when I discovered this garage in Lincolnshire, run by father and son David and Lee, I knew exactly which garage I was going to imitate. Here it is.
Materials used:
- Baseboard (wood or MDF)
- construction card
- clear plastic (from a blister pack)
- Nylon material
- Varying sizes of cardboard
- Hardboard
- Battery power string lights
- grass/gravel textures
- paints
- dowel (varying sizes)
- model cars for dismantling
- paper clips
- straw (or other item for chimney)
- Metcalfe benches
- String (for washing line)
- Printer (for signs)
- Scale trees
- car ramps
- 1/64 scale accessories
- a rainbow of imagination!

The garage houses the workshop, a storage room and an office, and sits in a yard with David’s house (he’s the one standing in the door). This was going to be the basis for my design. And so I began drawing some plans.
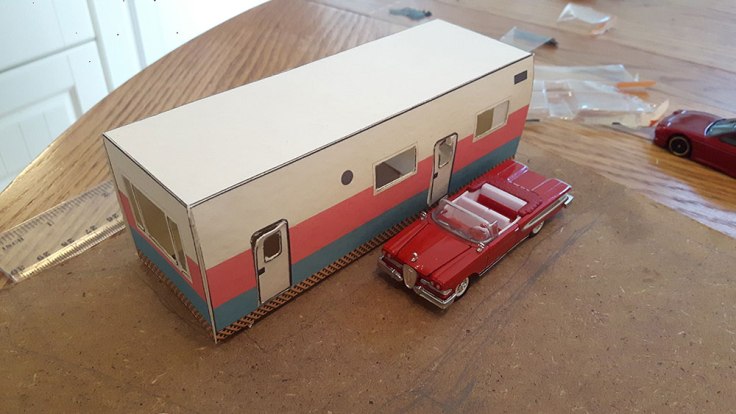
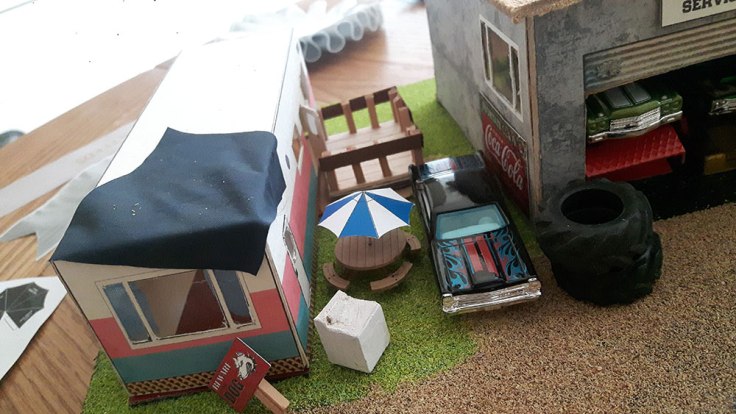
The first thing I wanted to do was make the garage unique to Mama J (or MJ) who is the character that owns it. Since I draw her as an anthropomorphic crocodile, I wanted to give her home a suitably redneck vibe, so I thought, even though it’s cliché, she could live in a trailer.
This was the first diorama which I decided to incorporate some lighting effects. I wasn’t going to do anything complicated since it was my first time doing anything like this.
I made the trailer in Adobe Indesign but you could use MS Word for this. Using construction card I printed the net design. The light does show through the material a little bit but I didn’t want to use anything that would make windows difficult to make in such a small size. In future I will be looking for some way to make it more opaque. After printing off the design, I cut out the black window pane shapes. I also cut around the top, bottom, and left side of the doors, and scored on the rear of the design over the hinge so they would open. I drew tabs on where I needed them by hand and then proceeded to cut out the trailer shape.
After having cut out the entire shape, I scored the lines appropriately so they would fold easily into the desired direction (remember that scoring makes it fold away from the knife mark). I made sure it all fit nicely by giving it a test fit.

Using pieces of blister-pack plastic (if you are a Hot Wheel collector, you should have plenty of this lying around, providing you don’t keep it mint in the packaging) I cut out squares for the windows, and using clear drying PVA stuck it to the window frames. Cut the sizes nice and big so they have more space to find purchase on the card.

The next thing I did was start creating a little patio area for one of the trailer doors. I also stuck a piece of wood-simulating card over a window for a bit of character. Note also that I made a small circle to mark where a chimney will go.

Using some nylon from an old pair of waterproof trousers, I added a tarpaulin on the top of the trailer, as I would imagine MJ wouldn’t be too worried about roof repairs when that’s the sort of thing that can fix a leak. That was all I was worried about until the rest of the diorama started coming into place.

The next step was to start thinking about the garage. I went to an antiques store in my nearby town where I found these two vintage car lifts. They were the perfect size to put inside the garage so this is how I determined the sizes of the rooms in the buildings. It would consist of a workshop, an office and a storage room much like David and Lee’s garage.

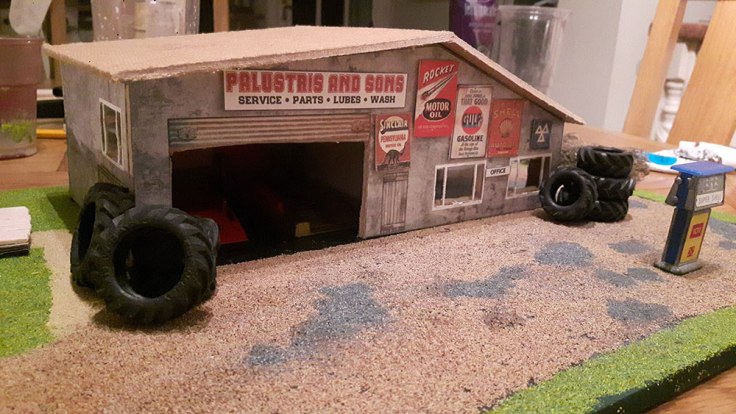
I designed the garage in Indesign just as before, making sure to measure out the doors and windows so that everything fit. The garage consists of four walls which I printed out, which will be stuck to hardboard. I didn’t need tabs since the hardboard will be easy to stick together.
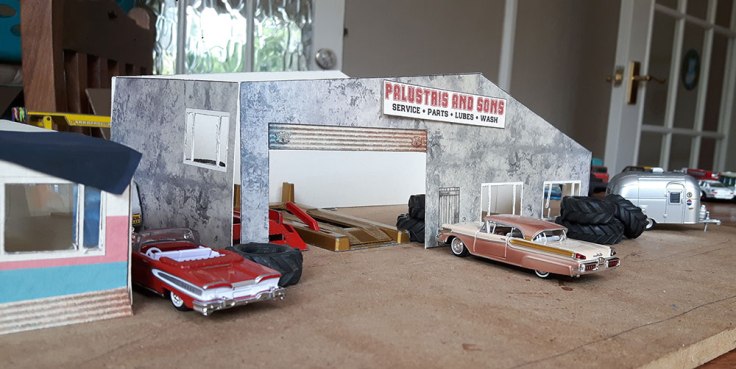
I cut out the windows again, and left enough of the garage door in place to look interesting. The rest of the material from the garage door went to make some corrugated style sheets. It’s always a good idea to test the sizes at this point and make sure it all fits together, especially if you are moving things in and out (you don’t want to finish the garage then find you can’t squeeze the lifts through the door!) I also started making some signage for the exterior.

To make the walls, I drew the outlines of the walls onto hardboard, then used a jigsaw to cut out the shapes. I then proceeded to cut the windows out with a stanley knife. Use a file or sandpaper to get rid of any rough edges.

Once again, using plastic from blister packs, I made window panes, and glued them first to the cardboard before gluing the cardboard exterior to the hardboard interior.

Using all-purpose superglue I attached the four walls to each other.

Some more signs for the exterior made using a home printer. I used blu-tac to attach them in the event I wanted to move them around (which I did) and also because it gives them more depth, I think.

I made a test roof using cardboard to make sure the size was correct, then I made one to the same dimensions using hardboard. At this point I began experimenting how I will position the lights. The lights I am using are string lights bought from Wilkinson’s for about £3. The LEDs on these lights are part of the wire so they are very easy to use for this. At this point I also added the interior walls to the garage. There are two, you will see it in a moment.
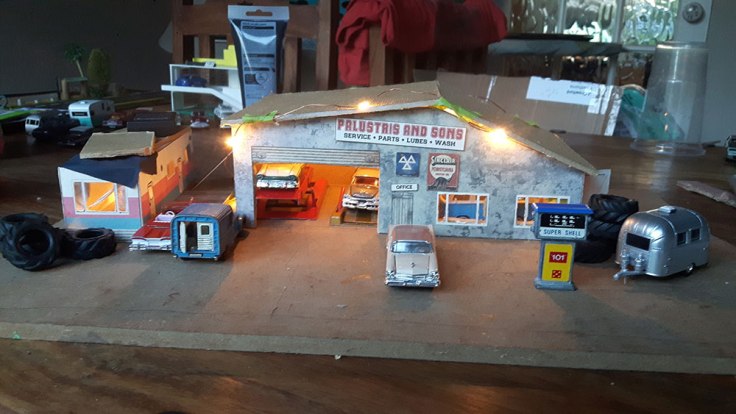

Using masking tape I fixed the fairy lights in place to make sure they all covered the spots I wanted. The battery back for the lights would be hidden by the trailer on the edge of the board. The wire then leads into the trailer through a hole in the side, with two lights attached to the ceiling. The wire then leads through the opposite side, near the roof, and goes across the way to the garage. The lights then go around the back of the garage, under the roof trusses, in through the double doors. They loop around the interior of the garage then come back out the same way they came in, to finish off lighting the front of the garage.

Once I knew how it would all fit together, I made a few more signs for the garage, and added a unique backdrop to the workshop (you could paint it, add tools, or anything you like – I decided to make a backdrop of my home country’s flag, Moldova) and then put the garage and trailer aside for the time being to make the baseboard.
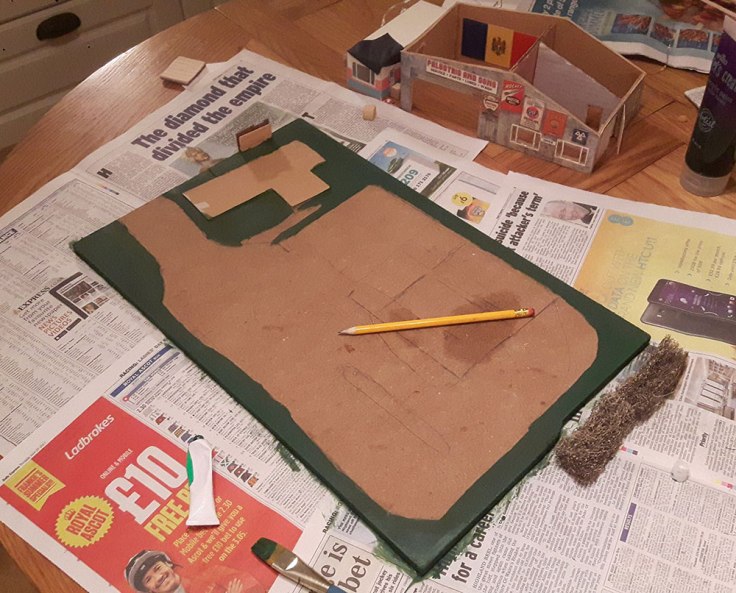
Marking out where the garage and trailer would go, I then marked out a path to the patio, and the yard and driveway position. Note also that I have added the interior walls for the garage, and so I have marked out a full floor plan on the baseboard, as I am painting the floors different colours. You will also see in this picture that I have added a cardboard base for the trailer, so it sits above the grass texture, and a small wall on the far side – this is where the battery back will be, and it is intended to wedge it between the trailer, to stop it from sliding off the board.

After having painted the grass area, I painted the brown surface which will hold the gravel of the yard. Then, I painted the blue floor of the office and storage area.

Finally, I paint a red floor for the trailer, and the black floor of the workshop. 
Adding some grass texture immediately brightens up the diorama. If you have read my previous posts you will know how I add this – I use a mixture of PVA and water (around 1 part PVA to 3 parts water) in a tub and a brush to apply the glue to the board, then using a cup filled with the material and a pair of stockings over the top I apply an even coating.

This texture I got from my local hobby shop. I have also added some hedge in the corner to hide a bad cut in the board.

The little details are everything, and while waiting for things to dry and settle it is a good time to be making some small exterior additions. I made a beware of the dog sign, a washing machine, and added some dowel to the patio to give it a better wood effect.

I used a coarse gravel texture mixed with a soft grey for the yard, and a softer sand texture for the path leading up to the patio. The coarser gravel finds it harder to find purchase on the board.
To complete the patio I used pieces of dowel, of varying size, to create posts and a barrier. I also bought this Metcalfe bench for the garden.

Very carefully, I use multi-purpose super glue to fix the lights in position where I planned for it. This is probably the trickiest part, as you will need to keep the buildings close together as you move around them and fix the lights in position.


When the lights are in place, I fix everything down. I use the superglue to fix the garage and trailer to the base board.

I make some finishing touches to the trailer area after this. From dowel I make some wood palettes, a propane tank, a stereo (with part of a paperclip as an antenna), and some gas canisters, and using a piece of string I make a washing line with some clothes attached to it that were printed from a home printer. Using paperclips and a dowel holder I made a roof antenna, and with a straw I attached a chimney (I was not too happy with it, but it is too late to change it now).

Sometimes, it is just easier to buy something than make it yourself, and a large manufacturer can do a better job than I ever could. These muscle pack accessories from Greenlight are really great and fit well with any diorama.
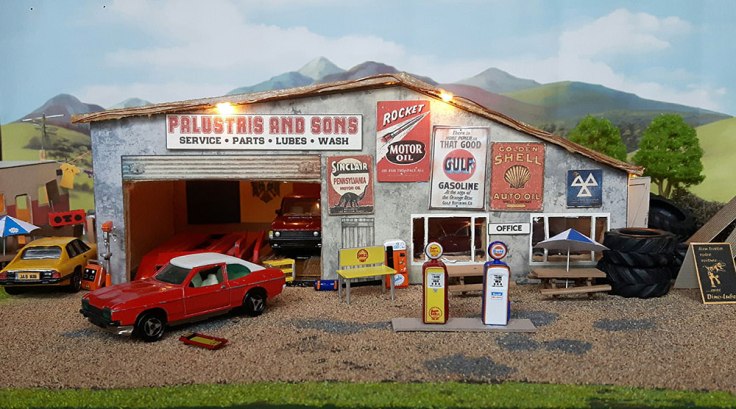
A diorama wouldn’t be complete without trees. I didn’t want anything too obtrusive so I stuck a few in the background and one or two in the front. I also got this nice background, though I could use a bigger one at some point.

You can make your own trees, but I prefer to have the ease of buying them online. Plus, you get lots of them, and they really don’t cost very much!

I like to mix it up with palm trees, since the diorama is supposed to be in a tropical region.

With this sort of diorama you can go on forever adding new things and more scale pieces, but the final section I decided to add was this trailer by Greenlight. I love the awning and thought it would be a great story to add. I picture an eccentric uncle called Warren living here, who is the on-site mechanical genius who does the serious modification and repair work for the motor cars. He needed a great relaxing area, so I cut up some Zylmex car interiors to make some chairs.
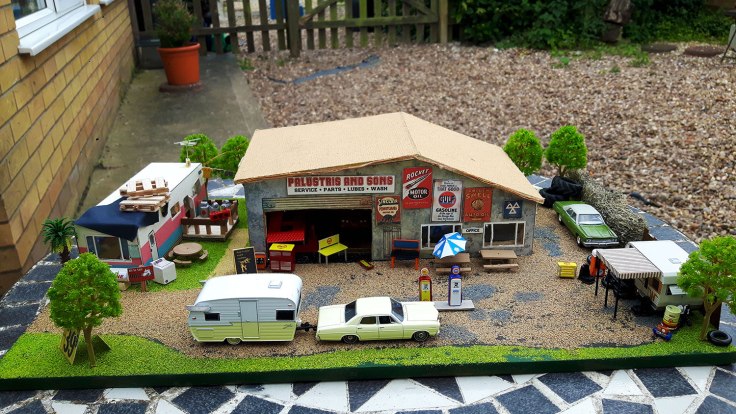
And so, there is my rendition of a classic English garage crossed with a classic redneck trailer! I later added some weathering powder to the trailer to give it a rusted effect, which again goes to show how you can keep on modifying your models.
I daresay you would be able to do much more with a larger baseboard, of course, but you risk making it less portable the bigger you make it, which may limit your options for background and lighting.

I hope you’ve enjoy going through this build with me, and I hope it can serve you some inspiration if ever you make a garage of your own.
Thanks for reading!
Like this:

Graphic designer and journalist View all posts by Jasmine
Workshop
164 scale, Diorama, Garage, Greenlight, how to, model, oldschool, trailer, vintage, Workshop

-
-
-