
Unity to maya converter download - necessary
Opinion: Unity to maya converter download
| Download ts bailey jay torrents | Heavems not.to far wethree free download |
| Chrome wants to download multiple files | Windows 10 download install usb |
| Download flash driver | Agile software development with scrum ken schwaber pdf download |
| Download driver hp psc 1401 all-in-one printer | Spss 22 free download for xp latest ver |
| Download hyperterminal for windows 10 | Generic travel brochure pdf download |
Unity to maya converter download - commit error

[Unity] Convert Humanoid FBX File into VRM
In this article, I will explain how to convert an FBX humanoid-avatar file into VRM.
Install UniVRM
Open Unity. We will convert FBX into VRM with Unity.
If you want to upload the model to STYLY, use Unity 2019.3.x.
First, import UniVRM to use VRM file in Unity.
Download the latest .unitypackage from the following site.
https://github.com/vrm-c/UniVRM/releases
Open this URL. Then, the screen shown below appears. The one highlighted in the red box will do. Basically, download the latest.
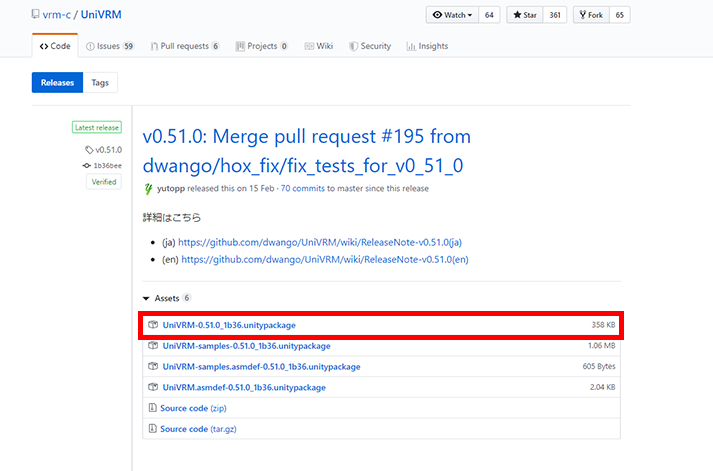
Download UniVRM
After downloading it, open a new project with Unity.
Double-click the UniVRM’s unitypackage file downloaded earlier to bring up the following window on Unity’s screen. Press ‘All’ and then ‘Import’.
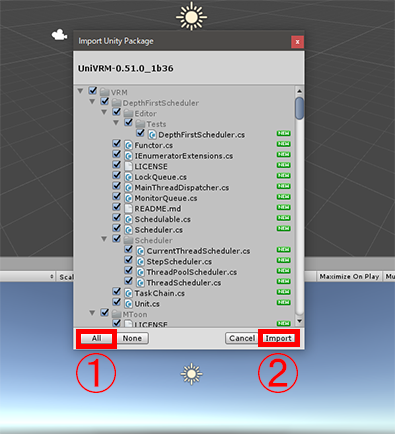
Import UniVRM
Now, you can use VRM files in Unity!
Adjust the Model Data
Adjust Bones
Import the FBX model that you want to translate into VRM to Unity.
You can import the file by dragging it onto the Assets folder in the Project window.
Select the imported model and press the Rig tab in the Inspector. Then, set ‘Animation Type’ to Humanoid and press ‘Apply’.
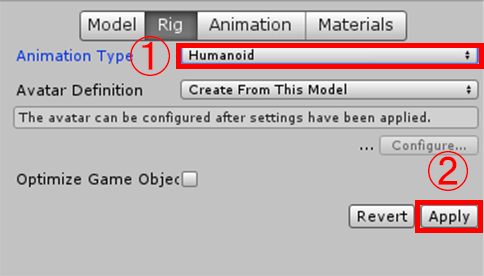
Select ‘Humanoid’
Once you press ‘Apply’, the ‘Configure…’ button above it will be enabled. Press it to open another Scene.
In this Scene, we check the bones. The problematic bones are shown in red. So, if you don’t have any ‘red’ bones, go back to the original Scene by pressing ‘Done’ at the bottom.
If you have the red ones, you need to correct them. Some errors could be caused by incorrect automatic identification when importing FBX.

Check the bones – there are some errors…
In this bone-setting window, the essential bones are shown with the ‘solid’ circle that is highlighted in the red box below. The ‘dotted’ circle highlighted in the blue box means a bone that is non-essential.
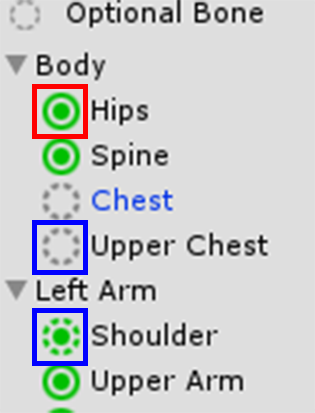
Essential and non-essential bones
So, those markers could be helpful when looking into the errors.
In my case, ‘Spine1’ set as Spine seems to be problematic.
So, to fix it, I set the ‘Spine2’ bone as Spine, which was originally assigned to Chest that is not an essential bone. However, this kind of correction could cause a problem, for example, when uploading the model to VRoid Hub (In fact, I couldn’t upload the model without ‘Chest’, so I added it again). Therefore I would recommend adding a bone in another way (ex. adding a new bone with Blender).
If you corrected something, press ‘Apply’ and then ‘Done’.
The Settings for Materials
After completing the bones, place the object in the Scene temporarily.
We set up the shader for the material.
You cannot change the shader of the material that was set when importing the model, so we create new material and assign it. Right-click on the Project window and select ‘Create > Material’ to create a new material. You can assign the material by dragging it into the model placed in the Scene view.
You can set the texture in the red box in the following screenshot. Click it to open the selection window. Alternatively, you can drag the texture into the box to set it.
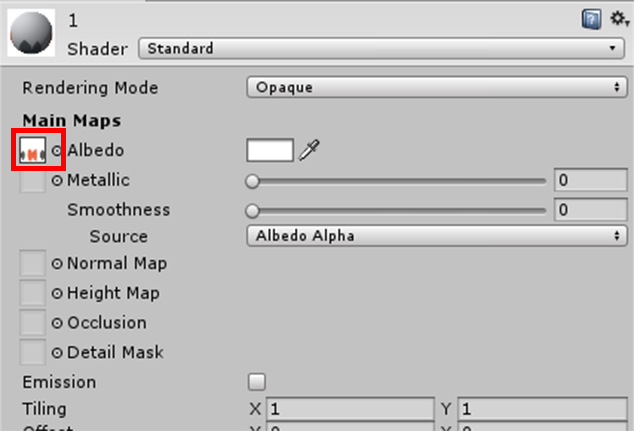
Set the texture
Select the created material (①) and select a shader (④) under ‘VRM’ (③) from the drop-down on the Inspector (②).
For VRM, the developer recommends using the shaders under ‘VRM’ (③) or ‘Standard’ at the top.
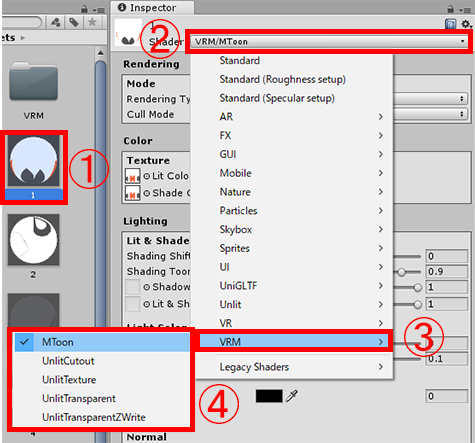
Change the shader
This time I assigned ‘MToon’ but I think ‘UnlitTexture’ is commonly used.
I recommend selecting all the materials and changing the shader at the same time.
Other Settings
After setting up the materials, check the other details next.
The points to check are:
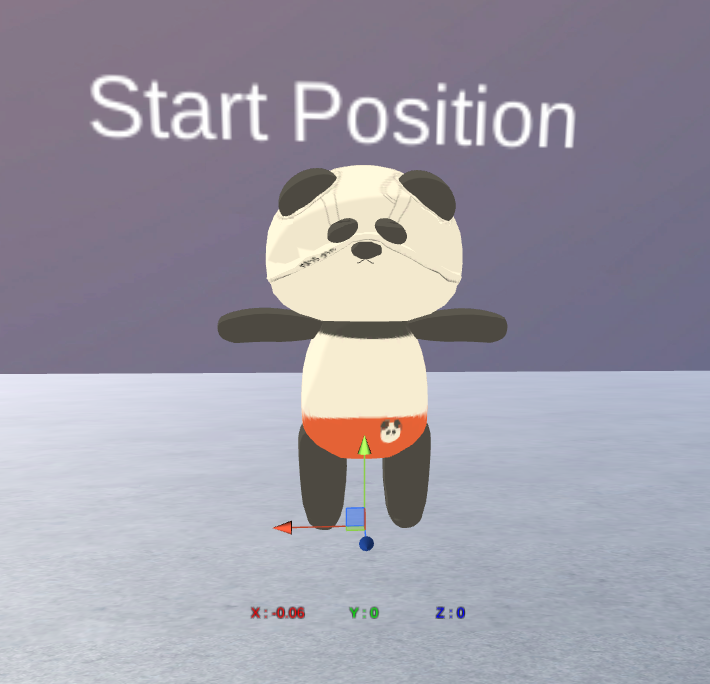
・ The position of the model > Is it at the origin (0,0,0)?
・ The scale of the model > Are the scale factors of X, Y and Z all set to 1.0?
・ The direction of the model > Is it facing in the Z-axis direction?
After checking them, we finally start converting the model.
Let’s Convert the Model
After checking the above, select the object in the Hierarchy window (①) and select ‘VRM > UniVRM > Export humanoid’ in the menu (②).
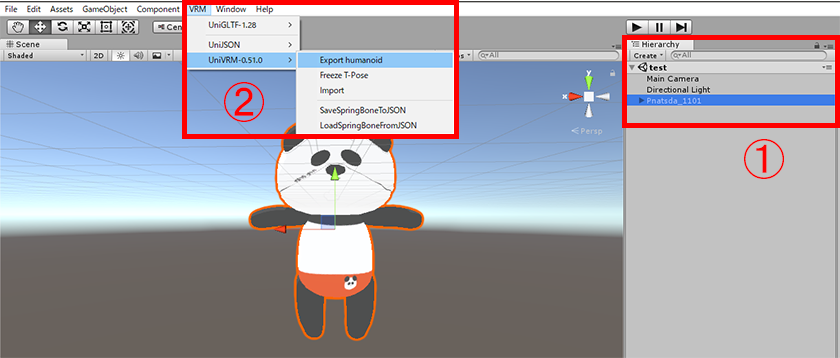
Convert into VRM
It brings up the following window. Fill in ‘Author’. It enables the Export button, so press it with all the checkboxes filled.
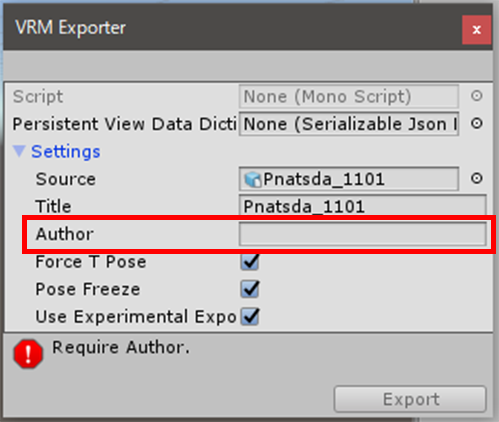
Fill in ‘Author’
When pressing ‘Export’, it brings up the window where you select the name and the folder. As a lot of folders will be created when converting, I recommend creating a folder under ‘Assets’ to keep them tidy.
The snapshot below shows how it looks after the conversion. The folders created when converting the model are highlighted in the red box.
You can find the VRM prefab in it, so select it.
After selecting the prefab, the section to set the information for VRM (highlighted in the blue box) appears in the Inspector. So fill them in.
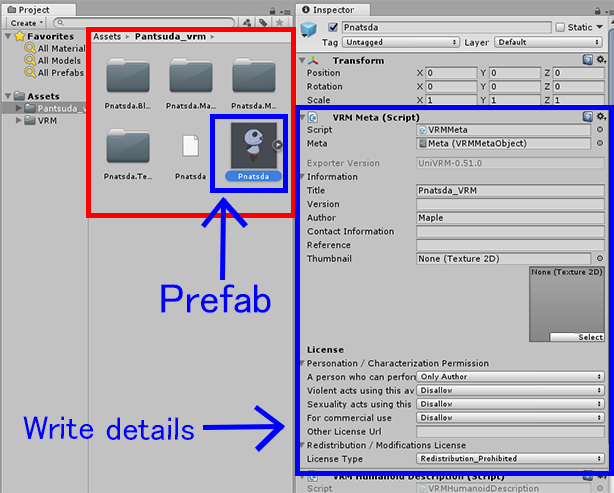
Set up the information for VRM
Information required:
・Title
・Version
・Author
・Contact Information
・Reference (if any)
・Thumbnail
License required:
[Personation / Characterization Permission]
・A person who can perform with this avatar (Only Author / Explicitly Licensed Person / Everyone)
・Permission to perform violent acts with this avatar (Disallow / Allow)
・Permission to perform sexual acts with this avatar (Disallow / Allow)
・For commercial use (Disallow / Allow)
・Other License URL (if any)
[Redistribution / Modification License]
・(Selections about redistribution / modification)
Please fill each field.
Once the set-ups are finished, delete the pre-conversion FBX object in the Hierarchy and place the converted VRM prefab in the Scene.
With the VRM object in the Hierarchy selected, select ‘VRM > UniVRM > Export humanoid’ in the menu as before. But, this time, uncheck the highlighted in the red box in the screenshot below. Export the model in this state.
As this is the final export, you can export to a location other than Unity’s project file (ex. the Desktop)
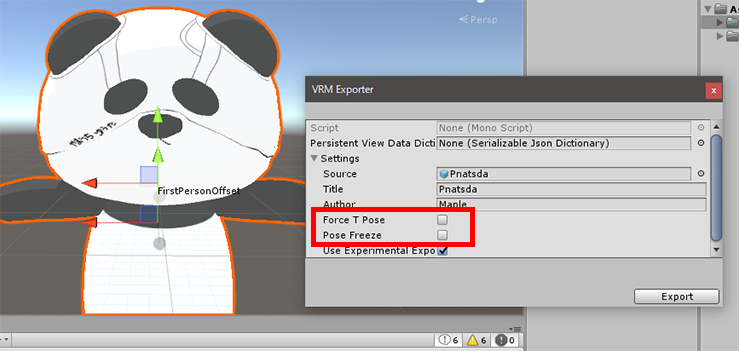
Uncheck them
If you export it under the ‘Assets’ of the Unity project, a lot of folders will be created. However, if you export to the directory that is not the Unity’s project file (the Desktop etc.), only the .vrm file will be created, so you just need to handle one file.
I could say that all information is now packed into the .vrm file.
That’s it! We have finished converting the model successfully!
You can use it as you like, uploading to VRoid Hub or VRC, etc.
Upload to STYLY
The following is for people who want to upload the converted avatar to STYLY.
Install the STYLY’s Unity plugin from the following official STYLY site.
Double-click the downloaded .unitypackage file to import it.
Once it’s imported, it brings up the following window, so type in the E-mail address and the API key.
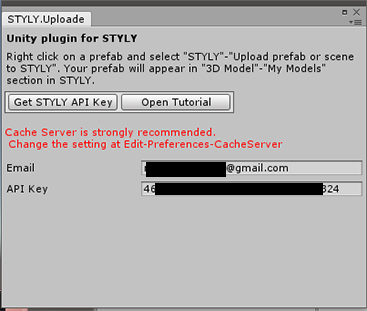
Set the E-mail address and the API key
Drag and drop the VRM object in the Hierarchy into ‘Assets’ in the Project window. It converts the object into the prefab.
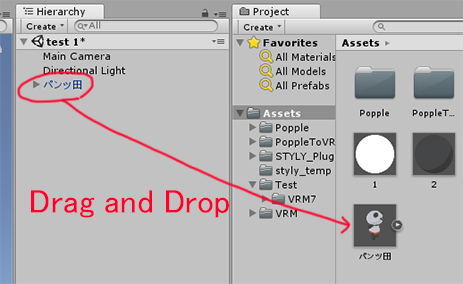
Create the prefab
After converting into the prefab, right-click the prefab in the Project and select ‘STYLY > Upload Prefab or scene to STYLY’.
Upload to STYLY
Wait for a while, then the ‘upload completed’ window pops up. Once it appeared, let’s move on to STYLY.
In STYLY Editor, go to ‘Assets > 3D model > My Models’. Now, you can see the model uploaded.
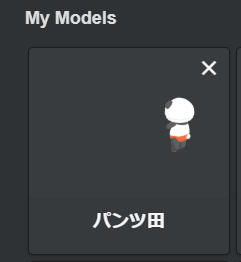
It’s been uploaded successfully!
That’s it for this tutorial!
Hooray!

0 thoughts to “Unity to maya converter download”